Pie Crust Cookies

A family of cooks, sharing recipes.

Pages

  • Home
  • About

Pie Crust Cookie Search

Showing posts with label desserts. Show all posts

Thursday, July 27, 2023

Kókópancakes

Posted by Colette


print

Kókópancakes


Adapted from: Alton Brown
Yields: about 10 (I usually double since these are easy to freeze and use later)

2 eggs
3/4 c milk
1/2 c water
1 c flour. all-purpose or a mix including some whole wheat
3 T butter, melted
1-2 T sugar, if you want sweet crepes
1 teas vanilla, ditto

Place the eggs, milk and water into a blender and mix until well combined. The add the flour, butter and extra ingredients, if you are using them. Run blender until all is well mixed and smooth.. You may need to use a scraper to push flour off the sides of the blender. AB recommends letting this sit in the fridge for 60 minutes for greater ease of cooking (less tearing), but Kókó and her daddy often don't wait to cook.

Heat a crepe pan or a small nonstick skillet (or best of all, a ponnukokupanna, an Icelandic pancake pan), over medium heat for at least 5 minutes. Butter the pan and use a teaspoon full of batter to test whether the pan is hot enough. It should take 30-60 seconds to cook on one side and fewer than that to cook the second side. Use a quarter cup measure to pour the batter in the pan, pick it up and turn and swirl so the batter slides into a thin covering of the bottom of the pan. When the edges dry slide a thin spatula under and flip the pancake carefully so the other side can cook. AB says he always plans on the first pancake being for the dog so don't get discouraged if your first few are not "beautiful". They will taste good. You can butter your pan between pancakes but I don't always do so. In addition, I prefer vegetable oil to butter. I think butter tastes better, of course, but for me oil is easier to work with. 

These can be treated as crepes but also as pancakes and you can use any topping including macerated fruit or berries. My favorite involves lemon juice and vanilla sugar. Other family members are fans of Nutella, powdered sugar, or cinnamon sugar, often all mixed together!
Labels: breakfast, desserts, fruit desserts, Icelandic
Email ThisBlogThis!Share to XShare to FacebookShare to Pinterest
No comments:

Tuesday, March 14, 2023

Pumpkin Spice Waffles

Posted by Colette

Here's another baked item (but in a waffle iron) made with a vegetable and some whole grain flour. These make your kitchen smell delicious. 


print

Pumpkin Spice Waffles


Adapted from: America's Test Kitchen
Yield: five to seven 7-inch Belgian waffles


ATK prefers store-bought oat flour with a very fine grind. They suggest if you don't have access to the flour, grind some old-fashioned oatmeal in a food processor into as fine a meal as you can get, about 2 minutes. They warn that it will be different, more dense. They also warn against using toasted oat flour in the recipe.

I made no adjustments for altitude.

2 1/2 c oat flour
1/2 c AP flour
1 teas ground cinnamon
1 teas baking powder
1/2 teas baking soda
3/4 teas salt
1/4 teas ground nutmeg
1/4 teas ground cardamom
1 (15-oz) can unsweetened pumpkin puree
1 1/4 c plain low-fat yogurt or Greek yogurt if that is all you have
2 large eggs
1/4 c oil (ATK recommends expeller-pressed canola oil)
1/4 c sugar
1 teas grated fresh ginger (if you like ginger, use more)

Heat your oven to 200F for keeping waffles warm after baking. start heating your waffle iron.

Place both flours, cinnamon, baking powder and soda, salt, nutmeg and cardamom in a large bowl and whisk together.

Measure yogurt in a large liquid measuring cup and add pumpkin, eggs, oil, sugar, and ginger and stir until combined. Pour into the flour mixture and whisk until smooth and well combined. If you use Greek yogurt, you'll need to add some milk or water until the texture is like cake batter or a thick pancake batter. 

When ready to bake, brush the iron with oil. Add a scant cup of batter and close the lid, cooking according to manufacturer's directions. Cook until waffles are deep golden brown and crisp. Serve immediately or keep warm in the oven on a cooling rack. 

Notes:

The original recipe found here instructs cooks to reduce the liquid in canned pumpkin by draining on paper towels. This worked well; in fact, too well. I had to add liquid and it was guess work, basing my guesses on what I thought waffle batter ought to look like. I added extra milk several times. The second time I made the waffles, I didn't drain the canned pumpkin and still had to add more liquid to attain the correct texture. 

You can substitute whole wheat flour for some of the oat flour, if needed. 

Add-ins are nice. I've used chopped fresh cranberries, blueberries, nuts, pepitas, and/or chocolate chips. I had to oil the griddle more often with some of the add-ins. 


Labels: bread, breakfast, desserts, light meals, quick breads
Email ThisBlogThis!Share to XShare to FacebookShare to Pinterest
No comments:

Sunday, December 4, 2022

Lemon Bread

Posted by Colette
I used to go to cookie exchanges when I lived in Marquette, Michigan, so long ago. I picked up this recipe one year and baked it many holiday seasons.


print

Lemon Bread


For my high altitude (almost 5000 ft) I made the following adjustments:

have eggs at room temp
subtract 1 1/2 T sugar
add 1 T lemon juice with milk
use half buttermilk and milk
add 1 1/2 T flour

Yields one 8X4 loaf pan

1/2 c butter, softened
1 1/4 c sugar
2 eggs, beaten
1 T grated lemon peel
1/2 teas lemon extract
1/2 c milk
1 1/2 c flour
1 teas baking powder
1/4 teas salt
1/2 c chopped pecans or walnuts, toasted

Prepare loaf pan by greasing and flouring it well. 

Combine butter and sugar and mix well. Add eggs, lemon peel, extract, and milk. Add flour, baking powder and salt, stirring just until moistened. Fold in nuts. Pour into loaf pan  Bake at 350F for 50-60 minutes. Cool 10 minutes in pan and remove. Allow to cool on a rack. Serve with with Cherry Cheese Spread.

Cherry Cheese Spread

6 oz. cream cheese, softened
2 T chopped maraschino cherries
3-4 teas maraschino cherry juice.

Notes:

I used about a third wheat flour, in this instance kamut.

In the above photo, the cream cheese was mixed with frozen raspberries. I like it both ways, although the maraschino cherries make for a sweeter spread.
Labels: bread, breakfast, desserts, holidays, snacks
Email ThisBlogThis!Share to XShare to FacebookShare to Pinterest
No comments:

Tuesday, April 12, 2022

Cast-Iron Skillet Brownies

Posted by Colette

Made with melted whole marshmallows and baked in a skillet, these brownies have a chewy edge and a fudgy point. When baked in a muffin tin, there's lots of chewiness for those on a chewy brownie quest.


print

Cast-Iron Skillet Brownies


Source: Cook's Country Magazine
Yield depends on how wide you cut the wedges. I cut 14. Baking in muffin tins yielded 21.

Adjustments for altitudes of 4,000-6,000 ft:

Subtract 2 1/2 T sugar
Add 2 T flour


2 oz. marshamllows (about 8 large marshmallows)
1/2 c plus 2 T warm tap water
4 T unsalted butter, cut into 4 pieces
2 oz. unsweetened chocolate, chopped fine
1/3 c Dutch-processed cocoa powder
2 1/2 c sugar
1/2 c vegetable oil
2 large eggs plus 2 large egg yolks
1 3/4 c AP flour
1 teas table salt
6 oz. bittersweet chocolate, chopped (You may substitute bittersweet or semi-sweet chocolate chips but they won't melt as much inside the brownie.)

Place your oven rack in the lowest position and preheat the oven to 350F. Use butter or baking spray to grease a 12-inch cast-iron skillet.

In a large bowl, combine marshmallows, warm tap water, butter, unsweetened chocolate, and cocoa. Place in the microwave and  run at 50 percent power until chocolate is smooth and fully melted. Stop microwave and stir occasionally. Let sit on counter and cool for 5 minutes.

Mix in sugar, oil, eggs and yolks, and vanilla with a whisk until completely combined. Gently stir in the flour and salt until just incorporated. Stir in the bittersweet chocolate or chocolate chips.

Use a rubber spatula to place the batter into the prepared skillet. Smooth the top and place into the oven and bake for 33-38 minutes until a toothpick test into the center of the brownie comes out with just a few moist crumbs and a little batter. Try not to overbake since the skillet will be so hot after removal that the brownie will continue to cook. Rotate the skillet approximately halfway through baking. Place the skillet on a wire rack and allow to cool for 30 minutes. You may want to place a kitchen towel or a hot pad over the handle so someone doesn't accidently grab it while the skillet is still hot.

Let cool for 30 minutes and serve with vanilla ice cream while the brownies are still warm. Or allow to cool completely for more precise wedges. These brownies are very tasty on their own.

If you prefer round brownies (and I do) grease the cups of two muffin tins and fill the cups about 2/3c full. These will cook faster, so start checking at about 25 minutes and remove when the toothpick test shows just a few crumbs. 

I found the brownies seemed to soften up during storage. Freezing and using them as needed helps with this, if you see it as a problem. 
Labels: cookies, desserts, snacks
Email ThisBlogThis!Share to XShare to FacebookShare to Pinterest
No comments:

Thursday, March 31, 2022

Chocolate Revel Bars

Posted by Colette
Chocolate, oatmeal, and almonds make a yummy bar cookie. 


print

Chocolate Revel Bars


Source: Cook's Country Magazine
Makes a 9X13 pan

3 c old-fashioned rolled oats 
2 c AP flour
1 1/2 c packed brown sugar, light or dark
1 c raw unsalted almonds, chopped
1 teas baking soda
salt
16 T unsalted butter, melted, plus 2 T unsalted butter
2 large eggs
2 teas vanilla
2 c (12 oz.) bittersweet chocolate chips
1 c sweetened condensed milk

Place the oven rack in the middle position and preheat the oven to 350F. Line a 9X13 pan with aluminum foil using enough foil that you can use it as handles when you remove the bars from the pan. Grease the foil once it is in place.

In a large bowl, place the oats, flour, sugar, almonds, baking soda, and 1 teas of salt. Stir to combine. In a second bowl, or a large glass measuring cup, mix the melted butter, eggs, and vanilla together. Pour the butter mixture into the flour/oatmeal mixture and stir until a dough forms. I found it easiest to use my hands to complete this step. Remove 1 1/2 cups of this dough for the topping and set aside in the bowl or measuring cup you used to melt the butter. Drop the remaining dough into the prepared pan and press to cover the bottom evenly. 

Place the chocolate chips, condensed milk, 1/2 teas salt, and remaining 2 T butter into a glass bowl and microwave at 50 % power until the chocolate chips are melted. Stir occasionally to ensure the mixture is fully combined. It took about 2 and a half minutes in my microwave. The chocolate will continue melting as you stir, so take it out of the microwave before all the chips melt away. This will look like fudge or thick chocolate frosting.

Spread the chocolate mixture evenly over the oatmeal crust. Using your hand, crumble the reserved oatmeal dough over the chocolate layer. Place in the oven and bake until the topping is golden brown, approximately 30 minutes. Remove from the oven and place the pan on a wire rack to cool until the bars are set, about 6 hours. Use the foil overhangs to carefully lift the bars out of the pan. Cut into bars  the size you prefer and serve.
Labels: cookies, desserts, snacks
Email ThisBlogThis!Share to XShare to FacebookShare to Pinterest
1 comment:

Thursday, March 17, 2022

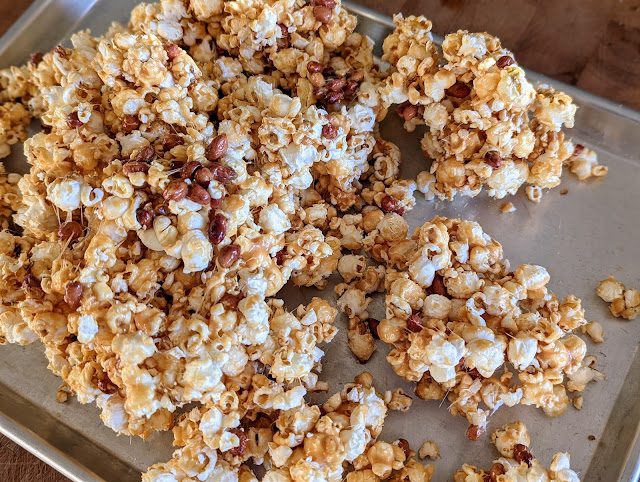
Grandma Betty's Popcorn Crisp

Posted by Colette

 This was one of my mom's favorite treats and she made it frequently. After her death my dad continued making it and often gave it as his Christmas gift to neighbors. 


print

Grandma Betty's Popcorn Crisp


Source: Betty Peterson who got it from her friend Glenneth Wilson

These temperatures are for sea level but I imagine my mother adjusted for altitudes in her various homes. For every 1,000 feet feet above sea level, reduce your target temperature by 2 degrees Fahrenheit.


1/2 pd. popcorn
1 1/2 c granulated sugar
1/2 c plus 1 T white Karo syrup
3/4 c water
1 c raw Spanish peanuts
1 t salt
1 t  baking soda
1 t vanilla
1 cube (1/2 c) melted butter, kept warm


Pop the corn and place it in a large kettle or roasting pan in a warm oven (275F) so both the popcorn and the pot will be warm when the syrup is ready. 

Mix the sugar, corn syrup and water and cook to 231F and add peanuts. Cook to 281 degrees and add salt. Cook to 291 degrees and the syrup is golden brown. Remove from the heat and add the butter, soda and vanilla stirring well. 

Moving quickly, but carefully, pull the kettle of popcorn out of the oven and scrape all of the hot syrup into the corn and stir well until all the popcorn is lightly coated. Pour out onto 2 baking sheets and spread out to cool. 

Alternatively, this may be made into popcorn balls but you'll need to butter your hands, and work fast. You may consider wearing gloves. 
Labels: desserts, snacks
Email ThisBlogThis!Share to XShare to FacebookShare to Pinterest
No comments:

Sunday, January 30, 2022

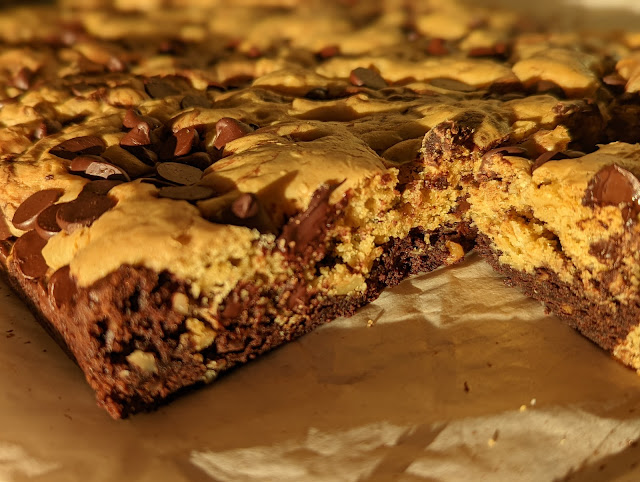
Brookies

Posted by Colette

Recently both Betsy and I cooked this cookie-brownie combo and it's not surprising that we both liked them. Plenty of chocolate!


print

Brookies


Adapted from NYTimes Cooking
Yields a 9X13 pan

Altitude adjustments for around 5000 ft above sea level:

Add 1 tablespoon flour for each cup of flour (I added half a tablespoon in the brownies and one tablespoon in the cookie dough) 
Subtract 1 tablespoon for each cup of either sugar


For the brownie batter:

8 T of unsalted butter, not including what you use to grease the pan
2 large eggs
1 1/2 teas vanilla extract
1/2 c AP flour
3/4 c cocoa powder, Dutch-process or natural
1/4 teas kosher salt (Diamond Crystal)


For the cookie dough:

6 T unsalted butter
1 c packed brown sugar, light or dark (but dark makes a prettier Brookie, I think)
2 large eggs
2 teas vanilla extract
1 1/4 AP flour
2 teas baking powder
3/4 teas kosher salt
1 1/4 c chocolate chips or chopped bar chocolate
3/4 c chopped walnuts or pecans, optional

NYTimes Cooking suggests that this recipe saves on dishes because you mix each batter in the same saucepan but they have you put the brownie batter in a bowl, wash the saucepan out by hand and then mix the cookie dough. This is certainly fine but not a true labor-saver. I, however, used a different saucepan for each batter. I believe I could streamline this next time by mixing the cookie dough first, placing it in the prepared baking pan while making the brownie batter in the same (well scraped) saucepan without washing it (the little bit of lighter dough wouldn't be a problem). This would mean the brownie portion would be more "on top" and would change the appearance of your final product but not the taste. These instructions reflect that choice. If you prefer, just use two saucepans.

Prepare the baking pan by greasing it and lining it with a generous sheet of parchment paper. It will be helpful when removing to have some excess on the ends or sides so you can use the paper as handles.

Preheat the oven to 350F.

Make the cookie batter first. Put the butter and sugar into the saucepan and heat over medium heat until the butter is melted. Lift the pan from the heat and vigorously whisk until the butter and sugar and completely combined. Let sit a few minutes to cool somewhat. You can chop nuts, or measure chocolate chips.

Once somewhat cooler, beat in the eggs by hand one at a time and add the vanilla. Stir in the flour, baking powder and salt. Stir in 3/4 cup of the chocolate chips or chopped chocolate and add the nuts. 

Using a spring-type ice cream scoop, place this dough in clumps in the bottom of the prepared pan. Use a rubber spatula to scrape out the dough as well as you can.  Set aside while you make the brownie batter.

Combine the butter and sugar in the saucepan and heat until the butter has melted. Off heat, vigorously whisk until combined and let rest and cool a bit.

Add the eggs one at a time and then the vanilla.

Stir in the flour, cocoa powder, baking powder and salt, ensuring no streaks of flour remain.

Using the ice cream scoop, place this batter amongst or on top of the cookie dough clumps. Use a small offset spatula to spread into an even layer, marbleizing as you spread. Sprinkle the dough with the remaining half cup of chocolate chips.

Place in oven and bake 20-25 minutes until a toothpick comes out with just a few moist crumbs. Set on a rack and cool completely before attempting to remove from the pan. Cut into bars and serve. 
Labels: cookies, desserts
Email ThisBlogThis!Share to XShare to FacebookShare to Pinterest
No comments:

Monday, January 10, 2022

Spaghetti Ice

Posted by Colette

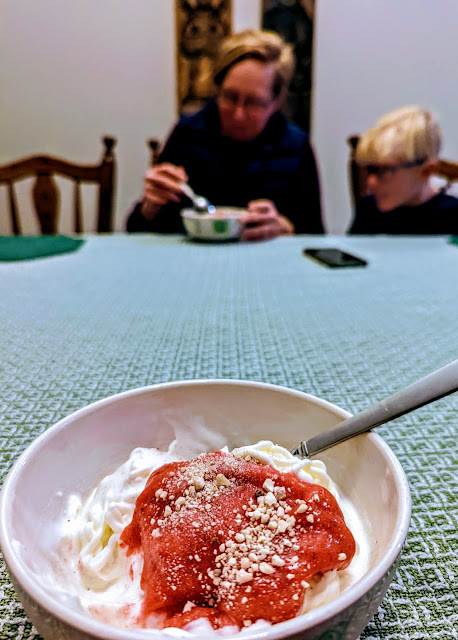
When our family lived in Europe, we were introduced to Spaghetti Ice, an ice cream dessert which, at the time, was served mainly in German Eis Cafés. It's a relatively simple concoction as far as ingredients go but making them at home requires a less-common gadget--a potato ricer (or a spaetzle press). In the Eis cafe's we visited in Germany, they had electric presses that extruded vanilla ice cream in thin, long spaghetti shapes. (I suppose, but don't know, that an electric pasta maker might work.) Strawberry sauce is the stand in for spaghetti sauce, and grated white chocolate looks like Parmesan. If you happen to have a ball shaped chocolate candy, you can include a "meatball". We often use Ferraro Rocher Hazelnut Chocolates, but current supply chain issues keep us reluctantly flexible.


print

Spaghetti Ice


Source: German Eis Cafés 


These instructions are for roughly 4 people, depending on appetites and ages. See this as a guide, not a true recipe.

1-1 1/2 c heavy whipping cream, whipped with some vanilla and a T of granulated sugar 
1 generous pint of strawberries, cleaned and trimmed if fresh, or thawed if frozen
1-2 T sugar
1 bar of white chocolate (preferably real chocolate, rather than imitation, if you can find it
vanilla ice cream, softened a few minutes at room temperature if your freezer runs very cold

Keep the whipped cream in the fridge to keep it as cool as possible.

You may want to place your bowls in the freezer or refrigerator before prep so the ice cream doesn't melt as fast. 

Place strawberries and sugar in a blender or food processor and run until smooth. Don't worry too much about getting it completely smooth since real spaghetti sauce can be chunky. Taste this to be sure it's sweet enough for you and add more sugar, if you'd like.

Grate the white chocolate on a microplane if you have one. Or grate the chocolate on the small wholes of a grater.

We prepare and serve these immediately to each individual, meaning the cook with the job of pressing the ice cream eats later. You could prep them and place bowls back in the freezer and serve all at the same time if that's important.

Place a big spoonful of whipped cream in the bottom of the bowl. Push a couple of scoops of vanilla ice cream through a potato ricer over the whipped cream and allow to mound up like a pile of spaghetti. This often ends up being a two-person job with the stronger person managing the pressing and a helper using a butter knife to cut the strands of ice cream off the bottom of the ricer.

Quickly top with some of the strawberry sauce and a spoonful of the grated white chocolate.  Place a chocolate "meatball" or two on the side and serve.


Labels: berries, comfort food, desserts, ice cream
Email ThisBlogThis!Share to XShare to FacebookShare to Pinterest
1 comment:

Sunday, October 31, 2021

Cranberry Lemon Bars

Posted by Colette

It's almost cranberry time. 


print

Cranberry Lemon Bars


Source: New York Times Cooking
Makes a 9X13 pan of bars

For the cranberry layer:

1 (12-oz) bag fresh or frozen cranberries
3 T water
3/4 c granulated sugar
2-3 large lemons

For the crust:

1 1/2 c AP flour
1/3 c granulated sugar
1 teas fine sea salt
1 teas vanilla extract
3/4 c unsalted butter, melted and cooled

For the lemon layer:

1 c granulated sugar
1/4 c AP flour
1/8 teas fine sea salt
3 large eggs, at room temp
confectioners' sugar, optional

To make the cranberry layer, combine the cranberries, sugar and water in a saucepan. Zest 2 lemons, over the saucepan, and reserve the lemons. Over medium-high heat, bring the ingredients to a boil while stirring occasionally. Cook until the berries pop and the mixture is jam-like. Turn off the heat and set the pan aside.

To make the crust, start by preheating the oven to 350F. Use heavy duty aluminum foil to carefully line a 9X13 baking pan and make sure there are no holes or gaps. Spray generously with cooking spray. Mix the flour, sugar, and salt in bowl. Stir the vanilla into the butter and then pour the two over the flour mix. Mix together and the dough will come together into a mass. Break the dough into pieces as you place it into the lined pan. Press with your hands to ensure the dough is an even layer. Place in the oven and bake until the layer is golden brown at the edges. 

Meanwhile, mix the lemon layer. Squeeze the reserved lemons and measure. You need one half cup; if you don't have enough, squeeze a third lemon. 

In a medium bowl, mix the sugar, flour, and salt. Whisk in the eggs and mix only until incorporated. Gently stir in the lemon juice just until smooth. 

When the crust is done, remove from the oven and allow to rest on the counter for 5 minutes and then spread the cranberry mixture over the top. Then slowly and carefully pour the lemon mixture over all, creating two distinct layers as well as you can. I found that the cranberry layer peeked out in some places.

Replace the pan in the oven and bake until the filling is set, 18-22 minutes. Remove and cool on a rack, until completely cool. Then place in the fridge for a couple of hours, at least. When firm and cold, use the foil as a sling and move all to a cutting board. With a sturdy sharp knife, cut into 24 pieces (or more if you prefer). making sure you wipe your knife between cuts. If you like, sprinkle bars with powdered sugar just before serving. 
Labels: berries, cookies, desserts, holidays
Email ThisBlogThis!Share to XShare to FacebookShare to Pinterest
No comments:

Thursday, October 14, 2021

Browned Butter Raspberries

Posted by Colette
This is one of those simple but surprisingly delicious desserts that we should serve more often because they are so easy. The recipe is more of a guide so following this precisely isn't completely necessary. 


print

Browned Butter Raspberries


Source:  Amanda Hesser on Food52.com
Serves 4

1 pound raspberries, at room temperature
4-5 T unsalted butter
1/4 teas vanilla extract
raw sugar or granulated sugar if that's what you have, about 1/2 teas per bowl depending on the sweetness of the berries

Divide the raspberries between 4 bowls. Place the butter in a 10-inch skillet and heat over medium. Allow the butter to melt and begin the bubble and boil. It will spatter so you may want to put a spatter guard on top of the skillet. The sputtering of the butter will settle down somewhat and the solids will begin to brown. Swirl the pan a bit so the butter will brown evenly. When the butter begins to smell nutty and the solids turn golden brown you can remove it from the heat. Add the vanilla.

Evenly drizzle the butter over the raspberries and sprinkle with the sugar. Serve immediately because it is best when the butter is warm. Diners can stir their berries before they begin, if they prefer.


Labels: berries, desserts, fruit desserts
Email ThisBlogThis!Share to XShare to FacebookShare to Pinterest
No comments:

Tuesday, September 28, 2021

White Peach Cardamom Crumble

Posted by Colette
I've still got a few white peaches on my tree, very few.


print

White Peach Cardamom Crumble


Source: howsweeteats.com
Serves 4-6

For the fruit layer:

6 white peaches, thinly sliced (4 cups, approximately)
2 T loosely packed brown sugar
1/4 teas salt
1/8 teas ground cardamom

For the crumble topping:

1/3 c rolled oats
1/3 c loosely packed brown sugar
1/3 c AP flour, you can substitute wheat flour if you prefer (I did)
1/4 teas cinnamon
1/4 teas salt
1/8 teas ground cardamom
3 T butter, softened
1/3 c sliced almonds

Heat your oven to 375F. Place peaches into a buttered baking dish (7X10 or approximate equivalent). Sprinkle with the brown sugar, cardamom, and salt. Stir until peaches are coated and set aside.

Combine the oats, flour, sugar, cinnamon, cardamom, and salt in a bowl. Cut in the butter using your fingers, a fork, or a pastry blender, until coarse crumbs appear. Spoon the topping over the peaches. Sprinkle the almonds over the top and place in the oven. Bake for 30-35 minutes, until golden. Let sit for about 5-10 minutes and serve with vanilla ice cream or yogurt (frozen or not).

Labels: desserts, fruit desserts, peaches
Email ThisBlogThis!Share to XShare to FacebookShare to Pinterest
No comments:

Tuesday, April 6, 2021

Lazy Daisy Oatmeal Cake

Posted by Colette
One of my pandemic activities was to sort through my old recipe card file boxes as well as those I inherited from my mom. I hadn't baked this since returning to the Mountain West and higher altitudes. It's not terribly fancy but quite homey and comforting with it's oatmeal and chocolate flavors. Pouring the custard sauce over the top makes this cake reminiscent of oatmeal-chocolate chip cookies with milk, but better. 


print

Lazy Daisy Oatmeal Cake


Source:  A church women's luncheon years ago
Makes a 9X13 pan

Adjustments for altitudes of 4000-5500 feet:

Reduce each sugar by 1 tablespoon
Increase the flour by 1 1/2 tablespoons
Reduce baking soda to 3/4 teaspoon
Increase vanilla to 2 teaspoons
Use room temperature eggs

1 1/4 c boiling water
1 c oats
1/2 c butter, at room temperature
1 c granulated sugar
1 c light brown sugar
1 teas vanilla
2 eggs
1 1/2 c flour
1 teas baking soda
1/2 teas salt
3/4 teas cinnamon
1 cup chocolate chips, semi-sweet or bittersweet

Preheat the oven to 350F. Prepare a 9X13 pan by greasing and flouring bottom and sides.  

Heat water, pour over the oats and cover; let stand 10 minutes. Beat the butter until creamy and add both sugars gradually; continue beating until somewhat light. There is so a high proportion of sugar it won't be as creamy. Add the eggs and vanilla.  Beat well. Stir in the oatmeal and blend well. Add sifted dry ingredients and stir until incorporated. The batter will be thick. Use a spatula to move it to prepared pan. Smooth the top and sprinkle the top with the chocolate chips. 

Place in the oven and bake for 30-35 minutes. Remove from the oven when a cake tester comes out clean. Allow to cool a bit. 
Custard sauce:

1 c evaporated milk
1 c sugar
2 egg yolks
1 cube butter
1 teas vanilla

Combine the ingredients in a saucepan and cook slowly until thickened. Allow to cool 10 minutes. Pour over pieces of cake and serve. 

This cake can be served warm or cool with the sauce poured over, although I like it best with the sauce warmed up.

The cake can sit at room temperature for a couple of days but leftover sauce must be refrigerated. Use it within 4-5 days.


Labels: cakes, desserts, oatmeal, vintage recipes
Email ThisBlogThis!Share to XShare to FacebookShare to Pinterest
No comments:

Monday, April 5, 2021

Sesame Blossoms

Posted by Colette

 These taste even better than peanut butter blossoms, and are, I think, prettier.


print

Sesame Blossoms


Source: Washington Post
Yields about 30

Altitude adjustments for elevations from about 4000-5000 feet:

Add 2 T flour
Subtract 1 T sugar
Scantly measure the baking soda 


Generous 1 3/4 c AP flour
1 teas baking soda
7 T unsalted butter, at room temp
2/3 c packed light brown sugar
1/4  granulated sugar
1/2 teas salt
1 large egg, at room temp
2/3 c well-stirred tahini
1 teas vanilla extract
1/2 c untoasted sesame seeds, for coating
approximately 30 chocolate kisses (I highly recommend dark chocolate, if you can find them)

Stir the flour and baking soda together in a small bowl. Beat the butter, sugars and salt together on low speed in either a stand mixer or using a hand mixer and a bowl. After a few seconds raise the speed and beat at medium for about a minute, just until completely combined. However, the mixture shouldn't be fluffy.

Add the egg, tahini and vanilla, and mix at medium just until smooth. Scrape down after 15 seconds and then beat for another 15 seconds or so until the ingredients are thoroughly mixed. 

Stir in the flour mixture and mix at low until the dough just comes together. Try not to overmix and stop when there are no dry patches. Scrape the sides of the bowl down with a rubber spatula and using a folding motion, mix by hand to ensure there are no unmixed portions. Cover the bowl and place in the refrigerator for between 1 and 24 hours. 

After chilling, place the oven rack in the middle and preheat the oven to 375F. Prepare 2 rimmed baking sheets by covering with parchment paper.

Measure the dough into portions using a heaping tablespoon full or a number 50 ice cream or cookie scoop. If you have a scale, the cookies should weigh about 20 grams. Roll each ball generously in the sesame seeds and roll once more to make sure the seeds adhere. Place them on the parchment paper about 2inches apart. You can place 12 on each sheet.

Cook one sheet at a time for approximately 10 minutes, just until the cookies puff up somewhat and are light brown and a little crackly. Pull the pan from the oven and set a chocolate kiss in the center of each cookie, pushing gently to embed it slightly. Return the sheet to the oven and cook for an additional 2 minutes until cookies are golden brown and somewhat flatter. The chocolate kisses will have softened but will hold their shape. 

Slide the parchment off the pan carefully and let the cookies cool on top of the counter. After a couple of hours the chocolate should have firmed up somewhat but they shouldn't be hard. 


Labels: cookies, desserts, holidays
Email ThisBlogThis!Share to XShare to FacebookShare to Pinterest
No comments:

Thursday, December 10, 2020

Grandma Betty's Picnic Cake

Posted by Colette

My mom made this cake often when our family went on one of our frequent picnics in the mountains. The term picnic cake appears to refer to any cake without frosting since it can transport so easily. In this case the topping of brown sugar, walnuts, and chocolate chips makes a frosting completely unnecessary. This is a plus as far as I'm concerned.

My mom's recipe came from her gas company, Mountain Fuel Supply which along with many natural gas supply companies of the 20th century employed "home economists" to create and test recipes for their customers. When the transition was made from wood burning stoves to gas, some cooks found the change difficult so these specialists were originally hired to help them. They did much to educate the public on how to cook before the job was taken over by celebrity cooks. Of course, the point was to acquire more customers and encourage them to use more natural gas, just like a recipe on the back of an oatmeal box or a cocoa container exists to increase consumption. The original recipe even instructs cooks to bake it in a gas oven! 


print

Grandma Betty's Picnic Cake

Source: a recipe Betty found at her local gas utility (Mountain Fuel Supply Co.), attributed to Jeanne Fenton, a home economist at the company
Makes a 9X13 pan


Changes for my altitude of nearly 5,000 feet:
baking soda with soaking dates--3/4 teas
subtract 2 T sugar
total of 1 7/8 c flour (or 1 3/4 plus 2 T)
baking soda with dry ingredients--1/2 teas
1 teas of vanilla

The following is the recipe as it appears on the dog-eared handout left in my mom's recipe box. I'm not sure if this recipe will work at sea level since I only remember it being baked at about 4500.

1 c finely chopped dates

1 1/2 c boiling water
1 teas baking soda

1 c sugar
1/2 c softened butter, softened
2 beaten large eggs
1/2 teas vanilla
1 1/2 c plus 3 T flour
1 teas cinnamon
1/2 teas baking soda
1/4 teas salt

for the topping:

3/4 c brown sugar
3/4 c chocolate chips, semi sweet or dark
3/4 c chopped walnuts (or whatever nuts you have)

Pour the boiling water over the dates and baking soda and stir. Allow to cool and proceed with the rest of the recipe.

Preheat oven to 350F. Prepare a 9X13 pan or two 8X8 pans with oil and flour. 

Cream the butter and the sugar together until creamy. Add the eggs and the vanilla mix well. Sift together the dry ingredients and add to the creamed mixture alternating with the dates and the soaking liquid.

Pour the batter into the pan. Sprinkle the topping evenly over the batter. You can either sprinkle each ingredient separately or you can mix them together and then sprinkle. I will choose the method that makes the fewest dishes to wash.

Place the pan into the oven and bake for around 40 minutes. Cool and serve.


Note on altitude: 

Altitudes kept me from cooking this recipe for a long time. Even though my mom's altitude was only 500 feet different than mine currently, I had to make adjustments for success. Most of the time 500 feet doesn't make much difference. I can't quite figure this out and wish I could visit several altitudes and test the cake. The fact that the original recipe has an odd addition of 3 T flour leads me to believe that test cooks used a sea level recipe and added the extra to adjust the recipe for a higher altitude. Wish I could find Jeanne Fenton and ask her. 


Labels: cakes, comfort food, desserts, vintage recipes
Email ThisBlogThis!Share to XShare to FacebookShare to Pinterest
2 comments:

Saturday, November 14, 2020

Pecan Bars

Posted by Colette
I've been a long-time fan of pecan pie but I may come to prefer the buttery, nutty flavor of these bars, especially once I detach myself from the sentiment resulting from years of gooey, oversweet pies at holiday meals.


print

Pecan Bars


Source:  Cook's Illustrated
Makes a 9X13 pan, about 24 bars

High altitude (4300-5300 ft) advice:  Check to see if bars are done at least 5 minutes before the recommended time. Mine were rather like hard butterscotch on the edges and they were baked for the lower amount of  time. 

For the crust:

8 T unsalted butter, melted
6 T granulated sugar
1/2 teas salt
1 3/4 c AP flour

For the topping:

3/4 c packed light brown sugar
1/2 c light corn syrup
7 T unsalted butter, melted and hot
1 teas vanilla extract
1/2 teas salt
4 c (1 pd) pecan halves, toasted
1/2 teas flake sea salt (optional)

First toast the pecans. Recipe authors recommend you don't use pecan pieces.  If you can't find halves or can't go shopping use what you have (you could even use walnuts.) I had on hand New Mexico-grown pecans which come in rough quarter pieces and I used about half a cup less since I was afraid the butter mix wouldn't cover everything.

Make the crust:

Place the oven rack on the lowest position and preheat to 350F. Prepare a 9X13 pan by making a foil sling, generously lining your pan with foil and leaving extra over the narrow sides for removing the cooled bars. Push the foil into the corners as fully as you can without tearing it. Spray lightly with cooking oil spray. 

To save on clean up, melt the butter in a medium glass bowl in a microwave. Mix in the salt and granulated sugar; stir, and then mix in the flour and stir until a dough forms. (If you prefer to melt your butter outside of the microwave, mix the flour, sugar, and salt in a medium bowl of any kind and pour the butter over.) You will likely need to use your hands to get the flour to mix in completely. It is ready when you squeeze a little of the dough in your hand and it remains in place and no streaks of flour remain. Take rough walnut size pieces of the dough and place over the bottom of the prepared pan. Press them together using your fingertips and palms. Smooth the dough as well and as evenly as you can. It's best not to have holes. 

Make the topping:

Wipe out the bowl you've already used with a paper towel and add the brown sugar, corn syrup, melted butter, vanilla, and salt. Whisk together for about 20 seconds; at first it will look like is won't come together but keep stirring. Fold in the pecans until nuts are all coated evenly.

Use a spatula to pour the nut mixture over the crust; it will be easier if you pour some near the corners. Spread it evenly over the crust and lightly push some nuts into each corner and to all edges. The recipe authors said there might be inconsequential bare patches but I had no problem with this. Place in the oven  and bake until the topping is even over the top and is rapidly bubbling over the entire surface, 23-25 minutes.

Remove from the oven and place on a rack to cool for 90 minutes. This may be hard to do but let them sit at least an hour so you can get them out of the pan. More importantly, let them cool so you don't end up with what my dentist calls "pizza palate."


Labels: candy, cookies, desserts, holidays
Email ThisBlogThis!Share to XShare to FacebookShare to Pinterest
No comments:

Tuesday, September 1, 2020

Peach Cobbler with Hot Sugar Crust

Posted by Colette
This recipe uses a technique which was new to me, except in hot pudding cakes. On first glance it appears it won't work. But this cobbler sports a lovely, crisp topping.


Unless you are serving a large group, I recommend you half this recipe and bake in an 8X8 pan. The cobbler is best right after baking and for a day or two afterwards; any longer and the topping will lose its crunch.

print

Peach Cobbler with Hot Sugar Crust


No modifications were made for altitude and it turned out great.

Adapted from Food52.com
Serves 10 or more

10 large ripe peaches (about 4 1/2 pds), pitted but not peeled and cut into chunks about an inch in size
1 large lemon
1/2 c unsalted butter, softened
2 c sugar, divided
1 1/2 c AP flour
2 teas baking powder
1 teas kosher salt (or 1/2 teas table salt)
3/4 c whole milk
1/2 c hot water
Heavy cream, for serving

Preheat the oven to 350F with a rack in the middle

Place the peaches in a buttered 9X13 baking dish. Using a microplane, zest the lemon evenly over the fruit. Squeeze the lemon and drizzle 1/4 cup of the juice over the fruit as well.

Cream the butter and 1 1/2 cups of the sugar on medium for a minute or so, until it is creamy but sandy. Stir in the flour, baking powder, and salt, and on medium speed, beat until incorporated and all is crumbly (30 seconds or more). Using a rubber spatula, scrape down the sides of the bowl.  Slowly pour in the milk while the mixer is on low speed. Beat a couple of minutes until the batter is light and fluffy.

Use a large spoon or the rubber spatula to drop 6 large portions of the mix over the peaches. (Make sure you get all the batter.) Carefully spread the batter with an offset spatula so that all the fruit is covered. Try to spread it evenly so that it is all about 1/2 inch thick overall.

Take the remaining half cup of sugar and sprinkle it evenly over the batter. In a small stream, drizzle the sugar topped batter with the hot water which will melt the sugar.

Place the pan on top of a large baking sheet and place both in the oven. Bake the cobbler until the top is crackly and golden brown, about 70-80 minutes. Use a toothpick to test; it will come out clean or with just a few crumbs clinging to it. Check in several spots.

Allow the cobbler to cool for about 30 minutes. Serve it warm with the cream poured over the top. If you have leftovers, cover and refrigerate.

Labels: desserts, harvest, peaches
Email ThisBlogThis!Share to XShare to FacebookShare to Pinterest
No comments:

Monday, November 25, 2019

Clementine Cake

Posted by Colette
If you like seasonal foods, here's a wintry dessert that can brighten your day with its sunny appearance. Don't be put off by the length of the recipe. The cake is as easy as zucchini bread but I've posted several options for topping it.


print

Clementine Cake


Adapted from Cook's Country Magazine
Serves 8-10


Cook's Country instructs cooks to make candied slices of clementines for garnish. They look very pretty on the cake but I found them awkward to eat. I prefer making a glaze with some clementine zest. I'll give instructions for both.


For the cake:

Altitude (3500-5500 ft) adjustments:

add 1 T flour
reduce baking powder to 1 teas
reduce sugar by 1 1/2 T

Note about almonds and blanched almond flour:

I checked with Cook's Country magazine about using almond flour rather than making your own by processing whole blanched almonds; they prefer whole almonds because toasting the almonds adds extra flavor to the cake. However, you can, and should, toast almond flour, if you use it. It's not hard; just don't leave it unattended for any length of time. Place the almond flour in a 12-skillet over medium heat and cook for 5-7 minutes stirring frequently until the almond flour has darkened in color and smells fragrant. Let it cool for 20 minutes before proceeding with the recipe. Also, make sure you weigh the almond flour since measuring it by cup will be different than measuring whole almonds. I also read on Washington Post that you can toast nut flours for 25-30 minutes in the oven at 250F. I'd advise stirring once or twice and checking as the end of the roasting time approaches.

9 ounces clementines (about five 2-inch diameter) unpeeled, stemmed
2 1/4 c sliced blanched almonds, toasted (or 7 1/2 ounces blanched almond flour, toasted)
1 c AP flour
1 1/4 teas baking powder
1/4 teas salt
10 T unsalted butter, cut into 10 pieces and softened
1 1/2 c granulated sugar
5 eggs

Place oven rack in the middle position and preheat oven to 325F. Prepare a 9" springform pan by spraying with cooking spray. Then line the bottom of the pan with parchment paper and spray or butter the paper and sides of the pan.

Place the clementines into a microwave safe bowl and cover with a lid. Cook on high in microwave until clementines are softened and some juice has been released (about 3 minutes). Throw the juice away and allow the clementines to cool for at least 10 minutes.

Place the almonds, AP flour, baking powder, and salt in a food processor and run until the almonds are finely ground, about 30 seconds. Move to another bowl. (If you use almond flour, when it has cooled add the AP flour, baking powder, and salt directly to the almond flour in the skillet; no need to move it to bowl.)

Place the cooled whole clementines to the processor container and process until smooth as you can get them, about a minute; scrape the sides down if necessary.

With a stand mixer and paddles, beat the butter and sugar on medium-high until pale and fluffy for about 3 minutes. (If  you don't have a stand mixer, use a hand mixer to cream the butter and sugar. Or if you've got a Bosch, use the cookie paddles on medium speed.) One at a time, add the eggs and scrape the sides of the bowl down if needed. Beat in the clementine puree until incorporated.

Turn your mixer to low and add the almond/flour mixture in 3 additions until just combined. If needed, scrape the sides of the bowl. Remove paddles (or beaters) from the bowl and use a rubber spatula to stir the batter a final time or two. Move the batter from the bowl into the prepared pan. Smooth the top. Place the pan in the oven and bake until a cake tester comes out clean, 45-55 minutes. Place the finished cake on a rack and allow to completely cool (about 2 hours).

Run a plastic knife around the edge of the pan and remove the cake. Drizzle with glaze and see directions below for optional candied clementines.

For a thin glaze:

1 c confectioners' sugar
pinch of salt
1/2 -1 teas clementine zest (optional if you are using candied clementine slices)
2 T clementine juice (or water) or more if needed

Mix  ingredients together. If it is very thick add water or juice, teaspoon by teaspoon until thin enough for drizzling. Use a rubber spatula to drizzle over the top of cooled cake. Let glazed cake sit on counter for an hour or so while glaze sets.

For a thicker glaze:

2 c confectioners' sugar
2 1/2 T clementine juice or water, plus extra if needed
pinch of salt
1/2 -1 teas clementine zest (optional if you are using candied clementine slices)

In a bowl, stir sugar, water, and salt together and whisk until smooth. If it is very thick, add water half a teaspoon at a time until the glaze is the consistency of thick craft glue.

Place the cake on a serving platter and pour the glaze over the top. Smooth with an off-set or rubber spatula and let some of the glaze run down the sides of the cake. Let it sit out for at least an hour so the glaze will set.


For candied clementines:


4 clementines, unpeeled, stemmed
1 c water
1 c granulated sugar
1/8 teas salt

Slice the clementines about 1/4 inch thick. Bring to a slow boil  the water, sugar, and salt in a small saucepan and keep heat at medium. Simmer until the sugar has dissolved.  Place all the slices, excepting the rounded ends, in the mixture and cook the fruit. Use paper towels to make a triple-thick lining on a baking sheet. When the clementines have cooked until softened (6 minutes or so), place the clementines on the prepared sheet. Cool for 30 minutes or more turning them over once.

Just before you plan to serve, choose eight of the candied clementine slices. If there is any excess moisture, blot it away with a paper towel. Place the clementines around the edges of the cake evenly so there will be one candied clementine for each of 8 slices of cake. Serve.

This cake can be kept in airtight wrapping or a container for up to two-three days.

Labels: cakes, desserts, high altitude, holidays
Email ThisBlogThis!Share to XShare to FacebookShare to Pinterest
No comments:

Sunday, June 9, 2019

Sour Cherry Cobbler (with adjustments for altitude)

Posted by Colette
For the last few summers a friend has generously shared the harvest from her sour cherry tree with me. This is one of the joys of the season.


print

Sour Cherry Cobbler (with adjustments for altitude)


Source: Cook's Illustrated
Serves: 12--however I halved the recipe and cooked enough for 6

For altitudes of around 4000-5800 feet I suggest the following adjustments to the biscuits:

add 2 T flour
subtract 1 teas sugar
use a scant teas baking soda

For the biscuits:

2 c unbleached flour
6 T granulated sugar
1/2 teas baking powder
1/2 teas baking soda
1/2 teas table salt
6 T unsalted butter (cold), cut into half-inch cubes
2 T granulated sugar for sprinkling
1 c buttermilk

For the fruit filling:

4 pds sour cherries, (about 8 cups)
1 1/4 c granulated sugar
3 1/2 T cornstarch
pinch table salt
1 c dry red wine
cranberry juice (if needed)
1 3-in cinnamon stick
1/4 teas almond extract


Prepare cherries:

Pit the cherries and reserve the juices. Stir sugar, cornstarch, and salt together in a large bowl; add the cherries and stir again until well combined. Pour the red wine over the cherries and allow to stand for 30 minutes at least.

Par cook the biscuits:

Preheat the oven to 425F with the rack in the middle position. Use a silicone baking pad or parchment paper to line a baking sheet.

In a food processor place flour, 6 T sugar, baking powder, baking soda, and salt and pulse until combined. Add the butter cubes evenly over the top and pulse about 15 times until the mixture looks like coarse meal. Place this mixture into a bowl and pour the buttermilk over. Toss with a rubber spatula until combined. Divide the dough into 12 equal biscuits on the baking sheet. This is easiest using a 1 1/2 inch spring-loaded ice cream scoop but can be achieved using a couple of serving spoons. Space them 1 1/2 to 2 inches apart on the baking sheet and sprinkle evenly with the 2 tablespoons sugar. Bake until lightly browned on top and bottom. Remove from oven and set aside. Leave oven on.

Make the cobbler:

Pour cherry mixture into a colander set over another medium-sized bowl and drain. Measure the drained and reserved juices; you should have collected 3 cups. If the combined juices don't equal that amount add cranberry juice. (I used some raspberry juice and think you could also use grape juice in a pinch.) Place the juices into a saucepan, add the cinnamon stick, and heat over medium-high and cook until mixture thickens, whisking frequently. When thickened remove cinnamon stick, add the almond extract.

Spread the drained cherries into a  9X13 pan. Pour the hot, thickened juices over the cherries in the pan and use a spatula to even it out. Place the biscuits on top of the cherries and filling in 3 rows of 4 each. Place the cobbler in the oven and bake until biscuits are golden brown and the filling is bubbling, 10-15 minutes. Remove and cool for 10 minutes before serving.


Notes:

If you are going to use frozen, pitted cherries you need less than 4 pounds, closer to 3 1/2 pounds.

It was late one night when I first started this recipe and I hadn't realized the resting time for the cherries so I mixed the cherries and sauce and and rested them in the refrigerator not for 30 minutes but overnight. This worked fine.

My food processor bowl has to be washed by hand so I get lazy about using it sometimes. I have found that I can grate well chilled or frozen butter into the dry ingredients of this biscuit and mix all together with a fork. I think it works just as well and the bowl and grater can go into the dishwasher.

Cook's Illustrated suggests using a glass baking pan. I can't see why it's necessary and found my metal pan worked fine.


Labels: desserts, fruit desserts
Email ThisBlogThis!Share to XShare to FacebookShare to Pinterest
No comments:

Saturday, March 16, 2019

Grandma Betty's Rhubarb Crunch

Posted by Colette
Spring is around the corner--I have rhubarb leaves breaking through the soil.


Print

Grandma Betty's Rhubarb Crunch 


Adapted from my mom's recipe
Yield: an 8X8 pan

1 1/4 pd rhubarb, cut into half-inch pieces (about 5 1/2-6 cups)
1 c old fashioned oatmeal
1 c flour (I like to use wheat but you can use all-purpose)
1 c brown sugar
1/2 c salted butter
1/4 c granulated sugar
1 teas cinnamon
1 T water
1/4-1/2 c chopped nuts

Preheat the oven to 350F. 

Mix oatmeal, flour, and brown sugar in a bowl and cut in butter until crumbly. (I like to grate frozen butter into these ingredients). Pat 1/2 of the mixture into the bottom of the 8X8 pan that has been buttered. Add sliced rhubarb to pan and top it with the granulated sugar, cinnamon, and water. (If you prefer you can mix the sugar and cinnamon together before sprinkling it over the rhubarb.) Mix the chopped nuts into the remaining crumble mixture and spread over the sugared rhubarb.

Place in the oven and bake for 40-45 minutes. Rotate the pan at about the halfway point and check it at about 35 minutes to ensure the crumble topping isn't scorching (if it is, top it loosely with a sheet of aluminum foil). Use a fork to test that the rhubarb is tender. Remove from the oven and let cool for 5 minutes. Eat as is or serve with ice cream, whipped cream, Greek yogurt, or pour some unsweetened cream over the top. 

Note: The original recipe calls for 1/2 c granulated sugar. This is just too sweet for me, but if you find rhubarb overly tart, you may want to use that amount of sugar.
Labels: comfort food, desserts
Email ThisBlogThis!Share to XShare to FacebookShare to Pinterest
No comments:

Saturday, March 9, 2019

Oranges in Caramel Sauce

Posted by Colette


print

Oranges in Caramel Sauce


Source: Milk Street Magazine
Serves 8 and can be easily halved

8-9 oranges, navel or cara cara oranges or a combination, blood oranges make a nice visual contrast
1 c granulated sugar
2 cinnamon sticks
2 T butter

Juice 2 of the oranges to yield 3/4 c of juice. I'd advise straining orange pulp out especially if you use cara cara oranges which tend to leave a lot of pulp behind  If this reduces the amount of juice you have left, squeeze some more and add another orange for slicing.

Cut the ends off the remaining oranges and stand each orange on end and cut off the peels and pith. You may notice from the photo that I only peeled mine because the white edges of the oranges don't bother me and I wanted to preserve as much of each orange as possible. Slice the oranges thinly and lay them overlapping somewhat in a 9X13 pan or casserole dish. 

In a medium saucepan combine the sugar, 1/4 c of the orange juice and the cinnamon sticks. Over medium-high heat bring this to a boil and cook, swirling the pan occasionally. The sugar will begin to color around the edges. The bubbling sugar will change from frothy and thin to shiny and thick. At this point reduce the heat to medium-low and cook until the mixture is coppery-brown in color, swirling often.

Off heat add the butter and stir constantly until melted. Splash a small amount of the remaining juice in and stir until smooth. The mixture will bubble and steam when the juice joins the caramel. Add the rest of the juice and whisk until completely mixed in. If the caramel sticks to the pan and separates, return it to the heat and simmer until the hard, toffee-like caramel dissolves. When smooth, pour the sauce evenly over the oranges and cover the dish. Place in the fridge for 3 hours.

I like serving this with plain Greek yogurt but you might like it with some ricotta cheese or even vanilla ice cream. 

Note:

I had some trouble with crystallization when I made this. I'm not sure whether it was caused by altitude or weather, but each can impact candy making (and caramel is candy). I added extra juice earlier than called for and cooked it until it was fully caramel colored. I used a small strainer to pour the sauce through to catch any sugar lumps that hadn't fully dissolved. 
Labels: desserts
Email ThisBlogThis!Share to XShare to FacebookShare to Pinterest
No comments:
Older Posts Home
Subscribe to: Posts (Atom)

Labels

  • about cooking (3)
  • appetizers (10)
  • Asian (2)
  • Belgian (3)
  • berries (26)
  • beverages (7)
  • bread (13)
  • breakfast (60)
  • cakes (16)
  • candy (2)
  • canning (1)
  • comfort food (58)
  • cookbooks (2)
  • cookies (34)
  • corn (6)
  • dessert toppings (6)
  • desserts (89)
  • dips (3)
  • eggs (1)
  • fish (6)
  • freezer (2)
  • fruit desserts (6)
  • German (1)
  • good for beginning cooks (71)
  • grill cooking (9)
  • harvest (16)
  • high altitude (40)
  • high carb (11)
  • holidays (39)
  • ice cream (5)
  • Icelandic (2)
  • Italian (18)
  • jams (1)
  • kid-friendly in theory (60)
  • light meals (41)
  • low carb (18)
  • main dish (113)
  • Mexican (24)
  • Michael's Favorites (11)
  • Middle Eastern (3)
  • miscellaneous (5)
  • muffins (9)
  • non-vegetable sides (9)
  • oatmeal (9)
  • one pan meal (5)
  • Pasta (2)
  • peaches (18)
  • pie crusts (6)
  • pies (10)
  • poultry (6)
  • preservation (8)
  • quick breads (12)
  • salads (38)
  • sandwiches (11)
  • sauces (10)
  • sea-level modifications (1)
  • seafood (8)
  • sheetpan (1)
  • slow cooker (12)
  • snacks (26)
  • soups (39)
  • South American (3)
  • stews (3)
  • Sunday night cooking (5)
  • tomatoes (17)
  • Turkish (3)
  • under 1 hr (63)
  • vegetable sides (51)
  • vegetarian mains--clearly (29)
  • vegetarian mains--nearly (15)
  • vintage recipes (3)
  • zucchini (31)

Blog Archive

  • ▼  2025 (1)
    • ▼  September (1)
      • Michael's Best Ever Tomato Sandwich
  • ►  2024 (4)
    • ►  November (1)
    • ►  February (3)
  • ►  2023 (12)
    • ►  December (1)
    • ►  July (2)
    • ►  June (1)
    • ►  May (2)
    • ►  March (1)
    • ►  February (3)
    • ►  January (2)
  • ►  2022 (37)
    • ►  December (3)
    • ►  November (4)
    • ►  October (1)
    • ►  August (1)
    • ►  July (5)
    • ►  June (2)
    • ►  May (2)
    • ►  April (4)
    • ►  March (4)
    • ►  February (5)
    • ►  January (6)
  • ►  2021 (21)
    • ►  December (2)
    • ►  November (2)
    • ►  October (6)
    • ►  September (2)
    • ►  July (1)
    • ►  May (1)
    • ►  April (4)
    • ►  February (2)
    • ►  January (1)
  • ►  2020 (31)
    • ►  December (8)
    • ►  November (1)
    • ►  October (4)
    • ►  September (6)
    • ►  August (3)
    • ►  July (2)
    • ►  June (1)
    • ►  May (1)
    • ►  April (1)
    • ►  March (2)
    • ►  February (2)
  • ►  2019 (32)
    • ►  December (5)
    • ►  November (2)
    • ►  October (1)
    • ►  September (1)
    • ►  August (4)
    • ►  July (1)
    • ►  June (3)
    • ►  April (1)
    • ►  March (7)
    • ►  February (3)
    • ►  January (4)
  • ►  2018 (13)
    • ►  December (4)
    • ►  November (1)
    • ►  April (2)
    • ►  March (1)
    • ►  February (3)
    • ►  January (2)
  • ►  2017 (32)
    • ►  November (1)
    • ►  October (2)
    • ►  September (5)
    • ►  August (2)
    • ►  May (3)
    • ►  April (4)
    • ►  March (8)
    • ►  February (6)
    • ►  January (1)
  • ►  2016 (37)
    • ►  December (4)
    • ►  November (4)
    • ►  October (3)
    • ►  August (2)
    • ►  July (1)
    • ►  June (3)
    • ►  May (4)
    • ►  April (2)
    • ►  March (4)
    • ►  February (5)
    • ►  January (5)
  • ►  2015 (50)
    • ►  December (2)
    • ►  November (4)
    • ►  October (9)
    • ►  September (4)
    • ►  July (1)
    • ►  June (4)
    • ►  May (2)
    • ►  April (3)
    • ►  March (3)
    • ►  February (6)
    • ►  January (12)
  • ►  2014 (44)
    • ►  December (2)
    • ►  November (3)
    • ►  October (5)
    • ►  September (5)
    • ►  August (11)
    • ►  July (2)
    • ►  June (3)
    • ►  May (2)
    • ►  March (5)
    • ►  February (3)
    • ►  January (3)
  • ►  2013 (153)
    • ►  December (7)
    • ►  November (12)
    • ►  October (6)
    • ►  September (13)
    • ►  August (23)
    • ►  July (19)
    • ►  June (16)
    • ►  May (16)
    • ►  April (23)
    • ►  March (16)
    • ►  January (2)

About Us

  • Betsy
  • Colette
  • Leon
  • Michael
Simple theme. Powered by Blogger.