Pages

Pie Crust Cookie Search

Showing posts with label high carb. Show all posts

Saturday, February 19, 2022

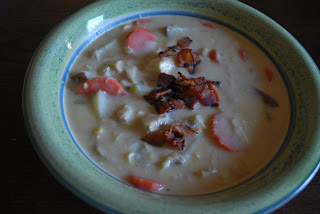
Farmhouse Chicken Chowder

Michael recently traveled to Idaho for steelhead fishing. When he's away, the kids know to expect lots of pasta and other high carb dishes. We discovered this soup last year during one of his trips, and it has become a staple of the "when Daddy is away" menu. 

The silky mouthfeel of this creamy soup is a main selling point for me, and the bacon and onion garnishes are a tasty addition. 


print

Farmhouse Chicken Chowder

Adapted slightly from Cook's Country: https://www.cookscountry.com/recipes/6436-farmhouse-chicken-chowder

6 slices bacon, chopped
6 scallions, white parts chopped fine and green parts sliced thin
2 carrots, peeled and sliced thin
1 celery rib, sliced thin
Salt and pepper
6 tablespoons all-purpose flour
5 cups low-sodium chicken broth
1 pound red potatoes, scrubbed and cut into 1/2-inch pieces
~3 c rotisserie chicken, cut or shredded into bite-size pieces 
1 cup half-and-half (or 1/2 c cream and 1/2 c milk)
3/4 c frozen corn

Cook the bacon in a dutch oven until crisp. Remove the bacon and put on a plate lined with paper towels. Spoon out all but 1 T bacon fat. Add the scallion whites, carrots, celery, and 1/2 teas salt and cook until softened, 5-7 minutes. Add the flour and stir frequently for a minute or two, until the flour is golden. 

Add broth and potatoes, then bring to a boil. Simmer on medium-low under vegetables are tender, 10-15 minutes. Add chicken, half-and-half, and corn and cook for a couple of minutes until the chicken and corn is heated. Season with salt and pepper, then garnish with scallion greens and bacon at the table. 

Wednesday, February 9, 2022

Quick Butternut Squash Soup with Apples and Bacon

Michael makes fun of me for eating soups primarily during cool weather and salads in the summer, but I stand by my seasonal eating habits. There's nothing quite like warming up from the inside out. Though this weekend will feel like spring, it's still winter for a couple of months, and this recipe is a quick option for butternut squash soup. 

I love that the technique in this recipe does not require cubing the squash, which takes forever. And, though you might not think bacon goes with allspice, the soup's flavors are delicious. I will sometimes garnish my bowl with toasted walnuts and chives, in addition to the bacon. This is lovely in a bread bowl!


print

Quick Butternut Squash Soup with Apples and Bacon


Source: How to Cook Everything Fast by Mark Bittman

8 slices bacon
1 medium butternut squash (1 1/2 pounds)
2 large apples
1 small onion
1 teas allspice
1/4 teas cayenne (1/16 teas for Betsy)
salt and pepper
5 c chicken stock
1 c cream

Prepare the squash: peel it, scoop out and discard the seeds, and cut into pieces that will fit well in a food processor. Bittman's instructions for peeling work well: "Cut the squash in half around the equator, stabilize the flat side on a cutting board, and work downward with a chef's or paring knife to slice the skin from the flesh, turning the piece as you work, then trim off the ends."

Cut the bacon into 1-inch pieces and begin cooking it in a large pot over medium heat. When the bacon is done to your desired crispiness, remove it from the pot and place it on a plate lined with paper towels, leaving the rendered fat in the pot.

While the bacon is cooking, peel, quarter, and core the apples. Then trim, peel, and quarter the onion. Shred the squash, apples, and onion in a food processor using a grating disk.

After the bacon is removed, add the shredded vegetables to the pot and turn the heat up to medium-high. Add the allspice and cayenne, along with a sprinkle of both salt and pepper. Stir and cook for about minute, until the spices are fragrant.

Add the stock and cream. Bring to a boil, reduce the heat so the soup simmers. Cook for 10-15 minutes, until the squash is tender. Turn the heat off and use an immersion blender to puree the soup.

Adjust the seasoning, if necessary, and then serve, garnishing with bacon.


Monday, February 5, 2018

Pasta with Kale Pesto and Winter Squash

Here's a pesto made from kale that stays green for as long as you have left overs, unlike some varieties that oxidize soon after preparation. Even better, you don't have to wait until summer provides you with baskets full of basil.


Print

Pasta with Kale Pesto and Winter Squash


Adapted from: New York Times
Yield: 3-5 servings 

1 1/2 pds winter squash (butternut, banana, acorn, etc.)
1/2 c oil, vegetable or olive
3/4 teas kosher salt, more for roasting squash
freshly ground black pepper
1 bunch of kale (about a half pound) center ribs removed
8-10 oz pasta
1/3 c toasted pine nuts
2 large garlic cloves, roughly chopped
grated zest of 1 lemon
freshly squeezed lemon juice, to taste
1/2 c grated Pecorino Romano or Parmesan cheese, plus more for serving

Preheat the oven to 400F. Cut the squash and remove seeds. Peel it and cut it into 1-inch pieces; place it on a rimmed baking sheet and drizzle with the olive oil. Mix with your hands to ensure each piece of squash is well oiled; then generously sprinkle with salt and pepper. Make sure squash is in an even layer and roast until golden brown and tender, approximately 30 minutes. Stir a couple of times. You'll want to have warm squash when the pasta is ready so once it has cooked keep it in a warm oven.

Meanwhile heat a large pot of  water, 2 quarts or so, and bring it to a boil. Add a tablespoon of salt and stir in the kale. Cook for a minute or two (if you are at sea level--use the lower amount of time). When the kale is limp, remove from the boiling water (don't drain the water) and cool. You can shock it in cold water or spread it out on a tray to let it cool rather quickly. Bring the water back to a boil. If you think you'll need more water for cooking pasta, add some now.

When the water has returned to a boil, place the pasta in the pot and cook according to package directions. I like to leave it with a little bit of chew since it will keep cooking once the pesto is mixed in.

Drain the kale well and wrap it in a dry kitchen towel. Squeeze the towel over the sink until the kale is quite dry. Chop the leaves roughly and place into a food processor. Add the pine nuts, garlic, salt, and lemon zest and process together until the mixture is very finely chopped (almost smooth) and salt has dissolved. Spoon some of the pasta water into the mixture and run the processor again until the pesto is fairly smooth.

When the pasta has cooked, drain it but remember to reserve a couple cups of cooking water. Return the pasta to its pan and stir in pesto. You may want to hold some out to make sure you like the ratio of pesto to pasta (I thought it fairly heavy and was glad I reserved some). Toss and add more pasta water to loosen the pesto, if needed, so it coats all the pasta.

Add the grated cheese, and a teaspoon or two of lemon juice. Taste to check for seasoning and add more salt if needed. Serve topped with roasted squash and more cheese.

Thursday, August 17, 2017

Creamy Corn Pasta with Basil

Well, hello!


Turns out that my little guy arrived shortly after my last post, a week before we expected him based on my previous deliveries. My summer has been a whirlwind as we have all adjusted to the addition of boy number four. Despite some difficult days and weeks, he is now sleeping through the night (hurray!!) and is a super pleasant baby for most of the day.

Most of my cooking is still survival-mode, feed-the-family cooking, but I'm starting to do a few more things, especially with all the fresh, amazing produce available here this time of year. Maybe I can manage this pasta soon. I discovered it last summer, and it's a lovely way to use fresh corn. As you can see, it was popular with a least one little!


print

Creamy Corn Pasta with Basil


Source: New York Times
Serves 4

12 oz dry orecchiette or farfalle
1 T olive oil, plus more for drizzling
1 bunch scallions (about 8), trimmed and thinly sliced with the whites and greens separate
2 large ears corn, shucked and kernels removed (2 c kernels)
1/2 teas ground black pepper
3 T unsalted butter
1/2 c grated Parmesan cheese, more to taste
1/3 c torn basil or mint, more for garnish
1/4 teas red pepper flakes, or to taste
fresh lemon juice, as needed

Cook pasta in salted water, until almost al dente but not quite. Reserve 1 c pasta water. (I have made this recipe twice and have forgotten to save the pasta water every time. I'm sure it will taste better with it!)

Heat oil in a 12 inch skillet over medium heat. Cook scallion whites with a pinch of salt until soft, just a couple of minutes. Add 1/4 c water and all but 1/4 c corn. Simmer for several minutes until corn is almost tender. Add 1/4 teas salt and 1/4 teas pepper. Place mixture in a blender and puree until smooth. Add water if you need it to get a "thick but pourable texture."

Place the same pan over high heat. Melt the butter, then add the remaining 1/4 c corn. Cook for 2 minutes, until corn is tender. Add corn puree from the blender and cook for 30 seconds.

Turn the heat down to medium, and add pasta and 1/4 c pasta water. Mix everything together to coat the pasta. Cook for one minute. Add more water if needed--my experience was that it needed quite a bit more water. I poured the water into the blender first to get every last bit of corn puree out, too.

Stir in 1/4 c scallion greens, cheese, herbs, red pepper flakes, and 1/4 teas each of salt and pepper. Sprinkle with fresh lemon juice. Garnish with scallions, herbs, olive oil, and pepper.


Tuesday, November 15, 2016

Grilled Chocolate Sandwich

During a visit to Germany in 1986 I tasted Nutella for the first time. Like a number of foods I discovered during my years of Air Force assignments and related travel, Nutella was not well-known in USA at the time. It almost goes without saying; I liked it, especially on sourdough bread. Some acquaintances found my fondness for bread and chocolate strange, even when I reminded them that Americans ate plenty of chocolate covered donuts (maybe multi-colored sprinkles won them over). During my eight years living overseas I continued to indulge in Nutella but the best chocolate and bread combo I ever ate was found at a Belgian patisserie near my home; the baker slathered chocolate between croissant halves. I admit to indulging myself often during my three years there.

A few years after returning to the states, I read about Grilled Chocolate Sandwiches in a cookbook by one of my favorite contributors to The Washington Post Food section, food scientist, Robert Wolke (unfortunately he no longer writes for them). He introduced me to a short, easy recipe which combines the flavors, if not the texture, of those chocolate croissants I still miss.


Print

Grilled Chocolate Sandwich


Adapted from What Einstein Told His Cook 2:  The Sequel Further Adventures in Kitchen Science by Robert Wolke
Serves 1, but can be multiplied

salted butter
two slices good bread
a handful of chocolate chips or 1-2 ounces chopped bittersweet chocolate or milk chocolate, if you prefer

Heat a nonstick or cast iron skillet or griddle over medium heat. Melt a pat of butter and place one slice of bread in the pan, moving the bread around to absorb the butter. Arrange the chocolate chips on the bread covering the slice well. Top the chocolate with the second slice of bread; let cook until the chocolate is beginning to melt and the bottom slice starts to brown. Be careful with the heat--you know your own stove top and may need to lower the heat so you don't burn the bread before the chocolate melts. When the bottom slice is golden brown, carefully flip the sandwich using a spatula. This is easiest if you use both hands; flip the uncooked side on to your non-dominant hand moving rather slowly in case there is still unmelted chocolate which might fall out. Once the flip is completed, melt another pat of butter and place the sandwich back in the pan, uncooked slice down. Tuck in any chocolate chips that may have fallen. Continue cooking until the second piece of bread is browned as well and the chocolate is melted.

Remove to a cutting board and slice; wait a minute or two and enjoy.

Note:

This sandwich is best when you combine quality ingredients. I like the flavors of sourdough bread but it isn't necessary. Just try for something with some heft and good flavor. I've seen photos of these using baguettes, but I think the chocolate would melt out of any holes. I use Callebaut chocolate chips with a higher percentage of chocolate. These chips are not American so they have less wax in them (they don't hold together well in a cookie) and they melt beautifully. If you can't find this brand, you might try those at Trader Joe's since that store imports some chocolate items from Belgium. I've not tried the chocolate chips so I can't vouch for them. The chocolate bars they sell (Pound Plus) are good, though.


Saturday, May 2, 2015

Buttered Green Pasta and Asparagus with Basil

Here's a recipe that highlights the asparagus season.


Print

Buttered Green Pasta and Asparagus with Basil


Source:  The Italian Vegetable Cookbook by Michele Scicolone
Serves 8

4 T unsalted butter, divided
1/4 c chopped scallions
2 pds asparagus, trimmed and cut into 1/2 in. pieces
salt and pepper to taste
1/4 c water
1 pd spinach pasta (of course, regular pasta can be substituted)
1/2 c basil, cut in chiffonade (rolled and thinly sliced)
1/4 c chopped flat-leaf parsley
3/4 c freshly grated Parmesan cheese

Bring a large pot of water to a boil.

Meanwhile, melt 2 T of the butter in a large skillet. Add the scallions and cook about 2 minutes. Add the asparagus, salt and pepper, and the water. Cover and cook at medium heat until the asparagus is crisp-tender, about 5 minutes.

When the water boils, add about 1 T salt and add the pasta to the pot and cook until al dente. Saving some of the pasta cooking water in a bowl or measuring cup, drain the pasta.

Add the cooked pasta to the skillet with the asparagus and add the remaining butter, the herbs, and toss well. Add some of the reserved pasta water to the pasta if it seems dry. Add half of the cheese and toss. Serve; passing the rest of the cheese to diners.


Monday, April 13, 2015

Lemony Peas and Pasta Salad

A perfect, light salad for springtime.


Print

Lemony Peas and Pasta Salad


Source: The Daily Herald
Serves 8ish (The salad is best the day it's prepared, so I recommend taking it to a potluck or halving it for a smaller family.)

1 lb penne or rotini
2 c sugar snap peas
2 c fresh or frozen green peas
1/4 c fresh lemon juice
2 teas lemon zest, plus extra for garnish
1/2 teas salt
3 T olive oil
4 c baby greens (arugula, spinach, or blend)
1/4 c chopped fresh herbs (optional, but yummy; mint is particularly tasty)
Parmesan cheese, shaved

Cook pasta according to package directions, adding sugar snap and green peas during last 3 minutes of cooking. Drain. Rinse with cold water and drain again. Place in large bowl.

While pasta is cooking, mix lemon juice, zest and salt in small bowl. Whisk in oil.

Toss the dressing with the drained pasta and peas. Gently toss in greens and herbs. Garnish with Parmesan and extra zest, if desired.

I imagine this would be good with chicken, too, if you want to make it heartier.

Saturday, August 23, 2014

Susie's Pasta

This is a long overdue post, and I thought I'd get it up before fresh basil and tomato season is over. We had snow on the mountains last night, and it's heralding the end of my garden, all too soon.

Susie's Pasta is named after my dear friend from graduate school, and it evokes memories of cozy evenings in Chapel Hill apartments, sharing dinner and good conversation in days long gone now. Susie served me this pasta when we were in library school together, and it quickly became a family favorite. The fresh herbs and tomatoes make a delicious sauce, and the garbanzo beans tend to nestle inside the shell pasta for a nice surprise when you take a bite.


The recipe calls for Roma tomatoes, but I have used a variety of small garden tomatoes and it's worked just fine.

Print

Susie's Pasta


Source: Susie
Serves 4-6 (generously, I think)

6 T olive oil
4 cloves garlic, minced
1 1/2 lbs plum tomatoes, diced
1/8 teas hot red pepper flakes (1/4 teas if you prefer more heat)
2 c garbanzo beans (1 can, or you could cook your own)
1 lb conchiglie pasta
1/4 c parsely, minced
1/2 c basil, chopped
1 c pecorino romano cheese, grated

Heat olive oil in skillet over low heat. Add garlic and saute 1 minute. Add tomatoes, hot pepper flakes, and salt to taste. Raise heat to medium and saute, stirring often, for 15-20 minutes. The tomatoes will break down and start to form a sauce. Stir in the beans and continue to cook until the beans are hot.

In the meantime, boil a large pot of water and cook the pasta until al dente. Retain 1/2 c of the pasta cooking water before draining. Transfer pasta to a large warm bowl. Add sauce, parsley, basil, and toss. Add cheese and toss, adding cooking water as needed to loosen the sauce.


Sunday, March 9, 2014

Potato Leek Soup

In some parts of the country, it seems like eternal winter, but here in Utah it's been mild and lovely for weeks. Before the chill is completely gone from the air, here's a favorite soup recipe.

This soup is simple yet delicious, and it means that I'm always on the lookout for beautiful leeks in the winter. Like most leek recipes, this soup uses the lower white section of the leek, so the more white there is, the more you can use in the soup. So beautiful leeks to me have long lower white sections. The chives or green onions as a garnish are technically optional, but they significantly enhance the taste so I highly recommend them.

It's best served with a loaf of crusty bread--beer bread is a good option.


print

Potato Leek Soup


Source: my Aunt Sandy Boizelle, via the Spackman Family Cookbook

2 celery stalks, thinly sliced (optional)
3 medium potatoes, peeled and sliced 1/8 inch thick
2-3 leeks, washed thoroughly and sliced 1/8 inch thick (don't use the tough green part, just the white part)
3 cans (about 4 1/2 c) chicken broth
1 can of cold water
1/2 c whipping cream
2 T butter
1 teas salt
1/4 teas pepper
chopped chives or scallions

Combine potatoes, leeks, chicken broth, and water in a large heavy pot and cover. Bring to a boil over medium-high heat. Reduce heat and simmer 35-45 minutes or until vegetables are tender. Without draining off broth, mash vegetables in the pan with a potato masher. The original recipe says to mash until quite smooth, but we like it a little chunky. Add cream, butter, salt and pepper and heat just to boiling point but do not boil. Serve with chives or scallions to sprinkle on top.

Friday, May 3, 2013

Tortas (Black Bean and Chorizo Subs)

This quickly became a frequent meal when we first discovered the recipe. To me it is messy enough to be considered a Mexican Sloppy Joe, but I think it tastes much better. 


Print

Tortas (Black Bean and Chorizo Subs)


Source: Rick Bayless in Mexican Everyday
Serves 5-6

8 ounces fresh Mexican chorizo sausage (casings removed, if in links)
3-4 T olive oil, divided
2 15-oz cans black beans (you can substitute other beans, such as pinto)
4-6 bolillo rolls or submarine rolls (6-7 inches long, 3 inches wide)
About 6 ounces Mexican queso fresco cheese, sliced 1/4 inch thick
1 ripe avocado, pitted and sliced 1/4 inch thick
salsa or hot sauce, to taste
cilantro, optional

Break the chorizo into a large skillet over medium heat. Cook, breaking up the clumps, until browned and thoroughly cooked. Add 1-2 T oil, depending on how much fat the chorizo has rendered. Add the beans and the liquid. Bring to a simmer and mash the beans with the back of a wooden spoon or a potato masher. Cook, stirring often, until it is the consistency of very soft mashed potatoes, leaving a few beans whole, 10 or more minutes. Taste and season with salt, if necessary. Keep warm over the lowest heat, covered to keep the beans moist.

Heat a griddle over medium flame. Slice the rolls open and scrape out some of the soft bread in the center of each half, making a small hollow. Pour the remainder of the olive oil on to the griddle and when hot, place the rolls cut side down on the griddle, dipping each piece in some olive oil. (You may also brush the rolls with olive oil before placing on the griddle.) Cook until crisp and golden brown. You will probably have to do this in batches unless your griddle is large.

Smear about 1/3-1/2 c of the chorizo-bean mixture over the bottom half of a roll. Top with slices of the cheese and the avocado. Spoon on the salsa or sprinkle with a dash of hot sauce. Top the cilantro, if you have it, and then the rolls and serve.

Notes from Colette:

Chorizo has fortunately become easier to find in the last few years. Some American companies (such as Johnsonville) now make Chorizo sausage but my favorite is the kind you can buy in a Mexican market. Sometimes it comes in links and sometimes it is ground. There are some small "chubs" you can find sometimes but they are quite greasy and not only will you not have to add oil, you'll probably have to get rid of some.

If the bolillos are very soft, there is no need to scrape out the center since the bread will smash down. 

Bayless suggests substituting (if necessary) feta or goat cheese for the queso fresco. They are not my favorite but Bayless, apparently, really likes goat cheese on a torta. I think you can use Monterrey Jack or even Manchego if you can't find queso fresco. You should be able to find it, though, since most supermarkets carry it nowadays.

Bayless points out that this recipe can be altered in numerous tasty ways such as adding rotisserie chicken or roast pork or beef. He also suggests toppings such as grilled onion or pickled jalapenos or chipotle en adobo.

The bean mixture stores well in the fridge and even better in the freezer. It may need a little additional water when warming it up.


Tuesday, April 2, 2013

Pasta Shells with Peas and Ham

I found this recipe paging through a Food and Wine cookbook at Michael's grandparents' home.  It's simple, tasty, and can feed a crowd. The last time I made it my two-year-old repeatedly asked for more--he probably ate 5 servings.


Print

Pasta Shells with Peas and Ham


Source: Food and Wine

1 lb small pasta shells or elbow macaroni
2 T plus 1 teas olive oil
5 garlic cloves, thinly sliced
10 oz package frozen peas
¼ lb thinly sliced country ham or prosciutto, coarsely chopped (I often use John Morrell diced ham)
1 ¼ c heavy cream
1 c low-sodium chicken broth
¼ c freshly grated Parmesan cheese
⅓ c chopped fresh dill (optional)

In a large pot of boiling, salted water, cook the pasta shells until al dente. Drain the shells, return them to the pot and toss with 1 t olive oil to prevent shells from sticking together.

In a large skillet, heat the remaining 2 T olive oil. Add the sliced garlic cloves and cook over moderate heat until the garlic is golden, about 4 minutes. Add the frozen peas and the country ham and cook until the peas are hot and the ham is lightly browned, about 5 minutes. Add the heavy cream and the broth and simmer over moderate heat until the cream has slightly thickened, about 5 minutes.

Stir the cream sauce into the cooked shells. Add the Parmesan cheese and the chopped dill (if using) to the pasta and season with salt and pepper.

Note from Betsy: Most often, instead of the fresh dill, I will sprinkle the finished product with dried dill weed, until I can see a pleasing amount of herb throughout the pasta.