Pages

Pie Crust Cookie Search

Showing posts with label comfort food. Show all posts

Friday, February 23, 2024

Spaetzle

I love this more than any other kind of noodle or pasta but it does require some specialized equipment or a technique American's are generally unaccustomed to. If you are willing to try something unusual you'll find an easy noodle that is better than store-bought.


print

Spaetzle

From seriouseats.com

Serves 4

1 c AP flour
1/2 c semolina flour
1 teas kosher salt, plus more for cooking water
1 teas finely minced fresh thyme and/or fresh sage
1 large pinch freshly ground black pepper
2 eggs
1/3-1/2 c milk

Place the flours in a mixing bowl and add the salt, herbs, and pepper. Whisk together. Measure milk and whisk the eggs into it while in the measuring cup. Pour into the dry ingredients. Use a fork to gently stir together. If it is so thick it's difficult to work with add a little more milk, up to 1/2 c in total. You should have a dough that is very sticky but not too wet.

Let it rest for 15 minutes.

Bring a large pot of water to boil over high heat. Just before cooking stir in salt.

There are a number of options for getting this dough into boiling water. I use a spaetzle press I purchased in Germany. These are available online but a bit pricey. You can use a dedicated potato ricer. (A press doesn't need to be a uni-tasker in the kitchen. I use mine for making spaghetti ice and for ricing potatoes when making mashed potatoes.) Press the dough through the hopper a large spoonful at a time right into the water, using a  table knife to cut the noodle batter about an inch long. The noodles will rise to the top of the water.  Allow them to cook for another couple of minutes. Scoop the spaetzle out of the water with a spider and place in a bowl. Repeat the process until all the dough is cooked. (You can also shock the noodles in ice water.) You can add butter or oil to keep the spaetzle from sticking to each other, although this isn't usually a huge problem for me.

Another method for spaetzle utilizes this a sheet of metal with holes that sets on top of the pot. I haven't tried it but it looks like it would work fine.

I've read of using a colander or the large holes of a cheese grater. 

Yet another method is to place the dough on the edge of a cutting board and cut bits of the dough off into the water. This might take some practice but it is doable. Here's a YouTube video for an example.

Once the spaetzle is cooked, add some butter, if desired, and taste for seasonings.  Top with finely chopped parsley. Serve as a side with brats, roasted meats, or goulash. 

Wednesday, January 26, 2022

Bacon Jam

After discovering bacon jam at a charcuterie café a couple of years ago, I was compelled to make it for myself. Having this recipe has been especially convenient during the last couple of  years. 


print

Bacon Jam

Makes about 1 1/4 cups

1 pd regular bacon (not thick-cut), cut crosswise into half-inch wide strips
1 c thinly sliced onion
4 sprigs fresh thyme
2 garlic cloves, smashed and peeled
4 c water
1/3 c cider vinegar, although any variety can be used
1/3 c maple syrup
1/8 cayenne pepper, more or less

In a 12-inch skillet over medium heat, cook the bacon until it is crispy, 15-20 minutes. Remove the bacon and place on a paper towel plate or quarter sheet pan. (I just used a bowl without a paper towel.) Remove most of the fat from the skillet, keeping only a couple of tablespoons for further cooking.

Add the onions, thyme, and garlic to the bacon fat and keep cooking over medium heat until the onion is browned and softened, 5-10 minutes. Add the water, vinegar, syrup and cayenne and stir. Then stir in the reserved bacon and increase the heat to medium high. Stirring occasionally, cook until nearly all the liquid has evaporated. In about 22-30 minutes the mixture will start to noticeably sizzle. 

Take the skillet from the heat and allow to cool for 10-15 minutes. Remove and discard the thyme sprigs. Use a rubber spatula to transfer the mixture from the skillet to a food processor and pulse 15-20 times until the bacon and onions are finely chopped. Serve warm. 

ATK states that this can be kept refrigerated for up to 4 days and reheated carefully in the microwave for a minute. If you want to store it longer, freeze it.

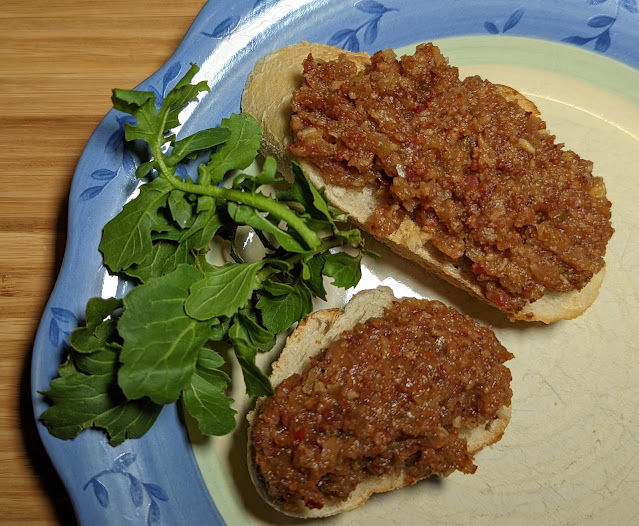
One of my favorite sandwiches is bacon jam on flat bread with arugula and burrata cheese. 

Monday, January 10, 2022

Spaghetti Ice

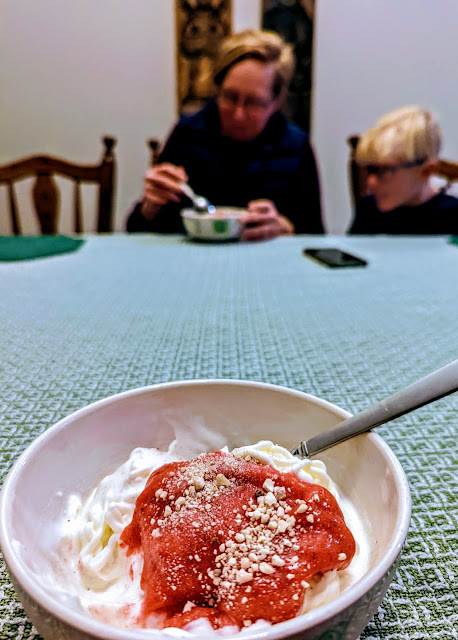
When our family lived in Europe, we were introduced to Spaghetti Ice, an ice cream dessert which, at the time, was served mainly in German Eis Cafés. It's a relatively simple concoction as far as ingredients go but making them at home requires a less-common gadget--a potato ricer (or a spaetzle press). In the Eis cafe's we visited in Germany, they had electric presses that extruded vanilla ice cream in thin, long spaghetti shapes. (I suppose, but don't know, that an electric pasta maker might work.) Strawberry sauce is the stand in for spaghetti sauce, and grated white chocolate looks like Parmesan. If you happen to have a ball shaped chocolate candy, you can include a "meatball". We often use Ferraro Rocher Hazelnut Chocolates, but current supply chain issues keep us reluctantly flexible.


print

Spaghetti Ice


Source: German Eis Cafés 


These instructions are for roughly 4 people, depending on appetites and ages. See this as a guide, not a true recipe.

1-1 1/2 c heavy whipping cream, whipped with some vanilla and a T of granulated sugar 
1 generous pint of strawberries, cleaned and trimmed if fresh, or thawed if frozen
1-2 T sugar
1 bar of white chocolate (preferably real chocolate, rather than imitation, if you can find it
vanilla ice cream, softened a few minutes at room temperature if your freezer runs very cold

Keep the whipped cream in the fridge to keep it as cool as possible.

You may want to place your bowls in the freezer or refrigerator before prep so the ice cream doesn't melt as fast. 

Place strawberries and sugar in a blender or food processor and run until smooth. Don't worry too much about getting it completely smooth since real spaghetti sauce can be chunky. Taste this to be sure it's sweet enough for you and add more sugar, if you'd like.

Grate the white chocolate on a microplane if you have one. Or grate the chocolate on the small wholes of a grater.

We prepare and serve these immediately to each individual, meaning the cook with the job of pressing the ice cream eats later. You could prep them and place bowls back in the freezer and serve all at the same time if that's important.

Place a big spoonful of whipped cream in the bottom of the bowl. Push a couple of scoops of vanilla ice cream through a potato ricer over the whipped cream and allow to mound up like a pile of spaghetti. This often ends up being a two-person job with the stronger person managing the pressing and a helper using a butter knife to cut the strands of ice cream off the bottom of the ricer.

Quickly top with some of the strawberry sauce and a spoonful of the grated white chocolate.  Place a chocolate "meatball" or two on the side and serve.


Friday, January 7, 2022

Sheet Pan Chocolate Chip Pancake

 Here's a way to cook multiple pancakes all at once.


print

Sheet Pan Chocolate Chip Pancake 


Adapted from:  New York Times Cooking
Serves 6-10

This can be halved for a smaller crowd. I also like to cook this on two quarter-sheet pans so one can stay warm in the oven if needed. It also helps me deal with the effects of my high altitude.

2-3 T unsalted butter, softened, plus 8 T  cut into half-inch cubes and chilled
1 1/2 c cold buttermilk
1 1/2 c cold milk 
3 c AP flour (I used half whole wheat)
1/4 c granulated sugar
1 T baking powder
1 teas baking soda
3/4 teas salt
3/4 c mini chocolate chips   


Preheat your oven to 450F. Prepare a sheet pan or two quarter-sheet pans by greasing with one tablespoon of the softened butter and lining with parchment paper. Alternatively, so you don't waste a bunch of butter under the paper, spray with cooking spray and then line the pan with parchment paper.

In a large liquid measuring cup, measure the buttermilk and milk and set aside.

Combine the flour, sugar, baking powder and soda, and the salt in a food processor. Drop the cubed butter in and process together until the mixture is coarsely sandy with some pieces the size of small peas. Place in a bowl and pour the milk mixture over . Use a whisk to combine and set aside for 5 minutes. Meanwhile, place the sheet pan into the oven to heat up.

Pull the hot pan from the oven and place 2 T of the softened butter on it. Return to the oven and allow the butter to melt. This won't take long if the pan is quite hot. Once more, pull the pan from the oven and spread the butter all over. You might be able to do this by tipping the pan but I found it easier to use a pastry brush to spread the melted butter everywhere. Carefully pour the batter into the pan; spread out to corners and sprinkle the chocolate chips over all. Set the pan back in the oven and allow to bake for 13-15 minutes until completely a toothpick comes out clean from the center. Place under the broiler for a minute to brown the top. 

Cut into squares or rectangles and serve with maple syrup, if desired. 

Notes:

I like the idea of cooking a number of pancakes at once but this recipe pays cooks back with more dishes than I like (and in the past I had to wash my food processor by hand). So I advise keeping the cold butter whole until you want to mix it into the dry ingredients; then grate in the butter (a flat grater easily fits into the dishwasher) and stir. If you feel you need to, blend the butter in a bit more with your fingertips. Also, if you have a very large liquid measuring vessel you can use that to hold the milks and then add the flour/butter mix. Just be sure this vessel is correct. I inherited a big glass measuring bowl but have found out the hard way that it measures incorrectly.

Other readers of the NY Times suggested topping with nuts and/or berries or other fruit, chopped. Blueberries sounded really nice. 

Saturday, January 30, 2021

Ciabatta

While many folks have turned to sourdough during the pandemic, my "comfort" bread has been ciabatta (I was lucky enough to have yeast in my freezer when others were having trouble acquiring it). I often "double" this by making one batch right after the other (I get four loaves for one oven heating). These loaves freeze well; to preserve the fresh, chewy texture I recommend you freeze what you won't use on baking day.


print

Ciabatta

Yields 2 loaves

For suggestions on adjustments for high altitude, see below.


For the biga:

1 c unbleached AP flour
1/8 teas instant or rapid-rise yeast
1/2 c water at room temperature

For the dough:

2 c unbleached AP flour (I've used 1 1/2 c AP plus 1/2 c whole wheat)
1/2 teas instant or rapid-rise yeast
1 1/2 teas table salt
3/4 c water at room temperature
1/4 c milk at room temperature
(or use 1 c water with 2 T powdered milk)

Between 8 and 24 hours before you want to bake, mix together the ingredients for the biga and allow to sit on the counter covered. (Once I couldn't attend to the bread after 24 hours so I put the biga into the fridge for another 24 hours. It didn't seem to hurt it.)

A couple of hours before you want bake, place the biga into the bowl of a stand mixer fitted with a dough hook and add all the ingredients of the dough. Mix together on low speed for a few minutes to get all the flour moistened. Turn the mixer to medium and allow to knead for 10 minutes. In a few minutes the dough will gather around the dough hook and look like it is climbing up. This is a very wet dough and as it becomes cohesive it will slap around the bowl a bit and may cause the mixer to walk around on your counter. So stay close and/or place a wet wash cloth or towel under your mixer to minimize this problem. It's recommended you don't add flour even though you think the dough is too sticky. However, I've added a tablespoon when it hasn't become cohesive after kneading 5-6 minutes.

You can place the dough into a new bowl for rising but I usually just leave it in the mixer bowl and cover it. (This method may be difficult if your machine has a post in the middle of the bowl.) Let the dough rise for 1 hour; use a rubber spatula sprayed or rubbed with a bit of oil to turn the dough over itself. Place the spatula under the dough on one side and turn it, rather like folding. Rotate the bowl and repeat folding ahead of previous fold. Turn the dough a total of 8 times around the circumference of the dough. Cover and allow to rise for 30 more minutes and turn the dough 8 times again. Allow to rise one more 30 minute period.

Place a pizza stone in your oven on the lower-middle rack and preheat to 450F. It's best to give your oven 30 minutes to reach full heat. Place a sheet of parchment paper close to the top edge of a pizza peel and sprinkle a little flour where you'll place the loaves.

Generously flour the counter and turn out the dough. Use a bench scraper or a knife to cut through the dough and with well-floured hands form each piece of dough into a loaf by flattening slightly (you don't want to get rid of all those nice bubbles) into a rectangle about 12 by 6 inches. Keeping your hands floured is the key to success when working with this sticky dough. Fold the short side down and then the opposite side up, like a letter. You should now have a rectangle about 7 by 4 inches. Don't worry too much about the exact size but this is a good general recommendation. Carefully move this loaf to the parchment paper on the peel and place the dough to one side. Repeat flattening and folding with the remaining dough and place it on the other side of the peel. You should have 2 loaves about 4-5 inches apart. (You can also cut your parchment paper into 2 pieces 12 by 6 inches and set them on the peel side by side.)

Sprinkle the tops of the loaves with flour and cover with plastic wrap and allow to rise about 30 minutes. Small bubbles will appear on the top of the dough. Using floured fingers poke the dough and lengthen the loaves to about 10 inches (and about 6 inches wide). Spray lightly with water and use the pizza peel to transfer the loaves and parchment paper on to the stone, making jerky, forward moves which will shake the loaves into the oven. During the first 5 minutes of baking, open the door and spray the tops of the loaves with water two more times. 

Bake for a total of 22-27 minutes until the bread measures 205-210F on an instant read thermometer. Use the peel to slide under the parchment paper and remove both loaves from the oven at once. Place on a rack to cool completely.

Notes on higher altitudes:

I find that at my altitude (5000 feet) the lower atmospheric pressure  means loaves formed as recommended above makes for flatter loaves that I'd like (they're still tasty, though). So I have taken to rolling the dough  (instead of folding like a letter) and placing a thinner, longer loaf onto the pizza peel before the final rise. My loaves at this point are more like 8X3. In addition, when poking the dough just before placing in the oven, I try to keep the loaves more narrow and long, by manipulating the dough towards its center so I once again have a thinner loaf than called for. 

Another thing to consider when allowing this bread to rise at a higher altitude is shortening the rising times slightly (5 minutes or so). At the very least, don't let it go over the recommended time. 

Thursday, December 17, 2020

Grandma Betty's "Old Fashioned" Barley, Tomato, and Vegetable Soup

When I was a teenager my mom, a competent and frequent canner, canned this soup every fall and used jars of it for quick meals. It was much better than something from a red and white can. Later I did the same, when I could get tomatoes in large quantities (the canning recipe calls for a bushel). On those harried days when our family arrived home with everyone really hungry, bottles of this soup saved my life. Both my mom and I usually added cooked ground beef but it isn't necessary if you want a meatless meal.

In the last decade or so the USDA and extension agents have determined that modern tomatoes do not have enough acid to make them safe for canning in a water bath canner like my mom used. She added copious amounts of sugar and vinegar in an attempt to help preservation but I'm told by my local extension canning authority that the only safe way to can this soup is with a pressure canner which I do not have. So when my brother Sam, who also remembers the soup fondly, asked me about it, I decided to reduce the old canning recipe (which yielded 17 quarts) and tweak it a little so we could enjoy the flavor of the soup without canning. 

Recently Sam and I cooked the soup together with some of the last of my summer tomatoes and we are happy to report it tastes just like our mom's home canned vegetable soup.  


print

Grandma Betty's "Old Fashioned" Barley, Tomato, and Vegetable Soup


Yields approximately 4 quarts

1/2 c pearl barley, soaked for 2 hours and cooked in water until al dente (don't over cook because it will cook  more later) 

1 T vegetable oil
1 large onion, chopped or 2 cups 
5 medium cloves garlic, minced 
4 sticks of celery, chopped
1 large green pepper, chopped
4 carrots, diced
about 4 pounds fresh tomatoes chopped or  2 28-oz cans crushed or whole tomatoes (squish these a bit)
2 bay leaves
1 quart water
1 T sugar (I think this is why we all liked this, including children)
1 1/2 teas salt, to taste (ditto)
1/2 teas freshly ground black pepper
1/4 c chopped parsley
2 T  cider vinegar or red wine vinegar
1 pound ground beef cooked in a skillet while soup cooks, optional


Soak barley in the same saucepan in which you will cook it. Drain the soaking water and add more and cook until al dente. Drain and set aside.

Heat oil in a Dutch oven over medium-low heat and cook the onions with a good pinch of salt until beginning to soften and become translucent. Add the garlic and cook for a minute. Add celery, carrots, and green pepper and cook while occasionally stirring until they soften somewhat. 

Add tomatoes (I used fresh but found a blender was faster than chopping), bay leaves, water, sugar, salt, black pepper. Bring to a strong simmer and turn heat down to a lower simmer and cook for about 45 minutes.  (I believe you can cook it for around 30 minutes if you use canned tomatoes.) Add the parsley, cooked barley, and the cooked ground beef and cook for 10-15 minutes more. Stir in the vinegar and serve. This is awfully good with grilled cheese sandwiches.

Note:

I think you could add other vegetables to this soup; green beans and corn come to mind. I wouldn't add summer squash until the last 15 minutes or so. 

I think you could reduce the amount of tomatoes to 3 pounds if you don't have four. You might want to increase the amount of water if you do. 


Thursday, December 10, 2020

Grandma Betty's Picnic Cake

My mom made this cake often when our family went on one of our frequent picnics in the mountains. The term picnic cake appears to refer to any cake without frosting since it can transport so easily. In this case the topping of brown sugar, walnuts, and chocolate chips makes a frosting completely unnecessary. This is a plus as far as I'm concerned.

My mom's recipe came from her gas company, Mountain Fuel Supply which along with many natural gas supply companies of the 20th century employed "home economists" to create and test recipes for their customers. When the transition was made from wood burning stoves to gas, some cooks found the change difficult so these specialists were originally hired to help them. They did much to educate the public on how to cook before the job was taken over by celebrity cooks. Of course, the point was to acquire more customers and encourage them to use more natural gas, just like a recipe on the back of an oatmeal box or a cocoa container exists to increase consumption. The original recipe even instructs cooks to bake it in a gas oven! 


print

Grandma Betty's Picnic Cake

Source: a recipe Betty found at her local gas utility (Mountain Fuel Supply Co.), attributed to Jeanne Fenton, a home economist at the company
Makes a 9X13 pan


Changes for my altitude of nearly 5,000 feet:
baking soda with soaking dates--3/4 teas
subtract 2 T sugar
total of 1 7/8 c flour (or 1 3/4 plus 2 T)
baking soda with dry ingredients--1/2 teas
1 teas of vanilla

The following is the recipe as it appears on the dog-eared handout left in my mom's recipe box. I'm not sure if this recipe will work at sea level since I only remember it being baked at about 4500.

1 c finely chopped dates

1 1/2 c boiling water
1 teas baking soda

1 c sugar
1/2 c softened butter, softened
2 beaten large eggs
1/2 teas vanilla
1 1/2 c plus 3 T flour
1 teas cinnamon
1/2 teas baking soda
1/4 teas salt

for the topping:

3/4 c brown sugar
3/4 c chocolate chips, semi sweet or dark
3/4 c chopped walnuts (or whatever nuts you have)

Pour the boiling water over the dates and baking soda and stir. Allow to cool and proceed with the rest of the recipe.

Preheat oven to 350F. Prepare a 9X13 pan or two 8X8 pans with oil and flour. 

Cream the butter and the sugar together until creamy. Add the eggs and the vanilla mix well. Sift together the dry ingredients and add to the creamed mixture alternating with the dates and the soaking liquid.

Pour the batter into the pan. Sprinkle the topping evenly over the batter. You can either sprinkle each ingredient separately or you can mix them together and then sprinkle. I will choose the method that makes the fewest dishes to wash.

Place the pan into the oven and bake for around 40 minutes. Cool and serve.


Note on altitude: 

Altitudes kept me from cooking this recipe for a long time. Even though my mom's altitude was only 500 feet different than mine currently, I had to make adjustments for success. Most of the time 500 feet doesn't make much difference. I can't quite figure this out and wish I could visit several altitudes and test the cake. The fact that the original recipe has an odd addition of 3 T flour leads me to believe that test cooks used a sea level recipe and added the extra to adjust the recipe for a higher altitude. Wish I could find Jeanne Fenton and ask her. 


Friday, December 4, 2020

Uncle Sam's Cincinnati Five-way Chili (Skyline-style)

Here's a yummy and hearty recipe from my brother and Betsy's uncle.  


print

Cincinnati Five-way Chili (Skyline-style)
guest post by Uncle Sam


Souce: a pamphlet from the American Heart Association years ago
Serves: About three

Ingredients:

1 lb. hamburger (lean for healthy, fatty for tasty)
2 medium onions, diced (one onion to cook, one to serve raw as a garnish)
2-3 cloves of garlic, minced
1 teas chili powder (or 1/2 teas red chile flakes) 
1/2 teas ground cumin
1/2 teas ground cinnamon
1/4 teas ground allspice 
1 can diced tomatoes (14 oz. can, NOT drained)
1 can kidney beans (14 oz. can, drained and rinsed)
3 T apple cider vinegar
2 T (heaping) semisweet chocolate chips
Grated cheddar cheese (as a garnish)
1/3 lb. spaghetti 


Brown the hamburger and sweat about half of the diced onions in a large pot. Bloom the minced garlic (heat directly against a cleared portion of the inner surface of the pot) for about two minutes. Bloom the chili powder, cumin, cinnamon, and allspice in the pot for about one minute. Add the tomatoes, kidney beans, vinegar, and chocolate chips. Simmer (the longer the better, all day if you have time, adding water if necessary). Cook the spaghetti to al dente in a separate pot about 15 minutes before serving. 

Serve in bowls, placing the chili directly on top of the spaghetti. Garnish with diced raw onions and grated cheddar cheese.

Note: the proportions of beef and bean can be  modified (if you don't have enough beef, use another can of beans). 


Friday, September 11, 2020

Chicken with Black-eyed Peas and Cherry Tomatoes

As we approach the end of summer, my garden-based meals start to reflect heartiness often found in fall and winter dishes. I credit the harvest of my black-eyed peas. This recipe is one that can be enjoyed all year round. 


print

Chicken with Black-eyed Peas and Cherry Tomatoes


Source: Christian Science Monitor which adapted a Bon Appétit recipe for sausage
Serves 6-8

4 pieces bacon, cut in quarter inch slices
8 bone-in chicken pieces (if using breasts, cut them in half)
salt and pepper
1 rounded teas dried thyme, divided (or 1 T fresh thyme)
1 medium onion, halved and sliced about 1/4-inch thick
3 cloves garlic, minced
2 1/2 c chicken broth
1/2 c dry white wine
1 11-oz or 12-oz frozen shelled black eyed peas, thawed (about 2 cups)
8 oz fresh green beans, trimmed
8-10 oz cherry tomatoes, halved if large

Place the bacon into a nonstick skillet or saute pan and cook until the fat is rendered and it is as crisp as you like. Using a slotted spoon remove the bacon and hold until later.

Sprinkle the chicken pieces with salt and pepper and half of the dried thyme. (If you're using fresh thyme don't add it at this point.) Place the chicken in the pan and cook over medium-high heat and brown the chicken on both sides. Move chicken to a plate or half sheet pan. Remove some of the bacon fat leaving a couple of tablespoons in the pan. 

Cook the onion slices until translucent. Add the garlic and the rest of the dried thyme and cook about 1 minute, until fragrant. Pour in the wine and bring to a boil and add the broth. Stir in the black-eyed peas until combined.

Return the chicken pieces to the pan as well as the juices that accumulated while set aside. Reduce the heat and cover the pan and cook until the black-eyed peas are beginning to become tender, around 15-20 minutes. Stir in the green beans and cook for about 5 minutes more. Add the cherry tomatoes and cook until heated about 5 more minutes. The tomatoes should begin to split and the broth should be thickening, If you are using fresh thyme, now is the time to add it. Taste the broth and add salt and pepper if necessary.

While the black-eyed peas and vegetables are cooking, it's a good idea to check the temperature of the chicken pieces. With a probe thermometer make sure the breast pieces are at 165F and the thighs and legs are at 175F. If the chicken reaches the target temperatures, remove and set on a plate while everything else cooks. Replace in the pan and warm the chicken before serving with the chicken placed on top of the vegetables. Sprinkle the reserved bacon over all. 

Serve the chicken on top of the vegetables and black-eyed peas.

Notes: 

You can shell your own black-eyed peas in season if you wish. Aim for about 2 cups of fresh shell peas.

If you prefer to skip the wine, increase the broth to 3 cups and just before serving the dish stir in a couple of tablespoons of white wine vinegar or sherry vinegar.

If you are cooking this when available green beans are substandard, I think you could experiment with subbing other vegetables, such as halved brussels sprouts (although you might need a larger pan since they don't have the slim lines of a green bean). 

Monday, July 27, 2020

Buttercup Cookies

A year ago this month, we joined family members in Iceland for the burial of our little grand daughter Sóley. Recently I've comforted myself when marking anniversaries of the loss of loved ones by cooking something they enjoyed eating. I'm unable to do that so I found a recipe that represents a buttercup bloom to me, for that is what her name means in Icelandic.  


print

Buttercup Cookies


Cook's Country (Hazelnut-Lemon Curd Kisses)
20-24 cookies

altitude changes for around 5000 feet:

add 1 T flour
decrease the sugar by 1 teaspoon

(Once I baked these and forgot to make altitude changes. They were still good, although slightly more fragile.)


1 c AP flour
3/4 c hazelnuts or pecans, toasted
pinch salt
8 T unsalted butter, softened
1/3 c granulated sugar
1 large egg yolk
3/4 teas vanilla extract
approximately 1/2 c lemon curd (purchased or homemade)
1/4 c confectioner's sugar, optional

Make the dough:

Set oven racks to upper- and low-middle. Preheat oven to 350F. Place parchment paper on 2 baking sheets. Place flour, nuts, salt in a food processor and grind until finely ground.

Place butter and granulated sugar in a bowl (either stand mixer or otherwise) and beat on medium-high until light and fluffy. Add the egg yolk and vanilla and continue beating until completely mixed in. On a lower speed, mix in the flour mixture just until incorporated.

Roll  dough into a 1-inch balls and setting each on the baking sheet about 2 inches apart. Grease a 1 teaspoon measuring spoon and use it to make an indentation in the center of each ball. You'll probably have to grease the spoon repeatedly. Bake about 10 minutes until just set.

Remove the baking sheets from the oven and gently press the measuring spoon into the existing holes to reinforce the existing indentations. Return to oven and continue baking, rotating and switching, until the cookies begin to brown around the edges (around 10 minutes, depending on altitude). On cooling racks, cool for 5 minutes on the baking sheet and then move each cookie the the rack until they have cooled completely. The cookies can be stored for 2 days at room temperature; they can be frozen, too, if you keep them in a single layer.

Once you have determined how many cookies you are serving, fill the imprint in each cookie with a teaspoon of lemon curd. Sprinkle with confectioner's sugar, if desired, and serve immediately.
Remaining cookies can be stored at room temperature for a couple of days until you are ready to fill and eat them. If you prefer, you may store them in the freezer but they tend to survive better if frozen in a single layer.

Place the lemon curd in the fridge until you serve the remaining cookies.

Cook's Country's instructions vary considerably from my own. The curd is baked in their version. Here are instructions for the process:

When the cookies have been baked the first 10 minutes. remove from the oven and deepen the imprints. While the cookie is still hot, fill each dimple with half a teaspoon of lemon curd. Return the sheets to the oven and bake for around 10 minutes until they have browned at the edges. Follow the advise above for rotating, removing, and cooling. Allow to cool before serving and sprinkle with  confectioner's sugar, if you like. This version can be kept at room temperature for a couple of days. I've cooked this version so rarely that I cannot advise about freezing.


Sunday, April 12, 2020

Pantry Crumb Cake

Like many other across the country, I'm baking more than normal these days. It's more for comfort and less out of boredom in my case; the current situation is providing a new test of my limits. I'm working from home, overseeing schooling for two older boys, caring for a toddler and a preschooler, and helping everyone deal with their emotions while also feeling quite a few emotions myself. So every comforting banana muffin helps.

Among the multiple recent batches of banana muffins are almond joy rice krispy treats, rice krispy treats with peppermint marshmallows, chocolate bread pudding, and this new-to-me pantry cake. A commenter on the original recipe suggested renaming it Covid Comfort Cake, so I'm not the only one who has enjoyed it. I hope it's comforting to you!


print

Pantry Crumb Cake


1  8 or 9-inch round or square cake
Source: New York Times Cooking https://cooking.nytimes.com/recipes/1020946-pantry-crumb-cake

To bake at altitudes around 5000 feet make these changes to the cake amounts:
add 1 1/2 T flour
remove 1/2 T sugar

For the topping:

1/2 c brown sugar
1/4 c unsalted butter, melted
1/4 c all purpose flour
1/4 c oats
1 teas spices (cinnamon, ginger, cardamom, or nutmeg in any combination; I used 3/4 teas cinnamon and 1/4 teas cardamom)
1/2 teas salt

For the cake:

1 1/2 c flour
1 teas baking powder
1/4 teas baking soda
1/2 teas salt
1/2 c unsalted butter, softened
1/2 c sugar
2 eggs
2 teas vanilla
2/3 c sour cream, yogurt or nondairy yogurt, buttermilk, crème fraîche, or milk acidified with 1 tablespoon lemon juice
1 teaspoon grated lemon or orange zest (optional)
½ cup fresh, frozen and thawed, or canned fruit, such as blueberries, raspberries, cherries, grated apple or pear, chopped pineapple (optional)

Preheat oven to 350F and butter your cake pan. This will work in an 8- or 9-inch round or square pan.

Mix all the topping ingredients together in a small bowl and set aside.

The original recipe was fiddly about combining ingredients. Here's my lazy version: beat the butter and sugar in a mixer for several minutes until fluffy and light. Add the eggs and vanilla, and beat again, scraping down the sides of the mixer bowl a couple of times. Mix in the sour cream fully, then add the flour, baking powder and baking soda and mix until just combined. If using, fold in the zest and/or fruit by hand.

Pour the batter into the prepared pan. Stir the topping mixture so it breaks up into crumbs and then sprinkle the crumbs evenly over the batter. Bake for 45-55 minutes, until a toothpick comes out clean, and let the cake cool in the pan. 

Thursday, March 26, 2020

Pumpkin, Cranberry, Chocolate Chip Baked Oatmeal

A couple of weeks ago I made this for breakfast on our first morning of social distancing. It's healthy and it's comfort food, although chopping the oatmeal and stirring in chocolate chips makes it seem quite like a dessert. Maybe that's not a bad thing at the moment.


print


Pumpkin, Cranberry, Chocolate Chip Baked Oatmeal


Source: Food52
Serves: 6-8

2 c rolled oats
1/2 c dark brown sugar
2 T unsalted butter
1 teas cinnamon
1 teas ground ginger
1/2 teas salt
1 teas baking powder
3/4 c pumpkin puree
1 T grated orange zest
1 T lemon juice
1 teas grated fresh ginger
1 c milk, (any variety)
1 teas vanilla
1 egg
3/4-1 c coarsely chopped fresh cranberries (or dried, see note below)
1/2 c chocolate chips, semi-sweet, dark, or white
1/2 c toasted pecans or walnuts
cream, or milk for serving

Heat the oven to 375F. Butter or spray a 9-inch pie plate or round cake pan.

Place the oatmeal, brown sugar, cinnamon, ground ginger, salt, and baking powder in the bowl of a processor and run it for a few seconds until blended. Drop the butter in the processor and run it until it is completely mixed into the oat mixture.

Add the pumpkin puree, orange zest, lemon juice, fresh ginger, milk, vanilla, and egg and pulse a few times until well blended.

By hand stir in the cranberries, chocolate chips, and nuts. Place the mixture into the prepared pan and move to the preheated oven.

Bake for 25-30 minutes until the oatmeal begins to brown on top and a testing toothpick comes out with no liquid.

While hot, cut into wedges or serve with a large spoon and pour milk or cream over each serving. It's also tasty with yogurt.

Notes:

The use of the food processor to chop up the oatmeal results in texture more like a shorter sweetbread. The next time I baked it I used only half the oatmeal in the food processor and added the rest when I stirred in the cranberries, etc.

This recipe originally called for soaking dried cranberries in brandy but I couldn't bring myself to ignore the fresh berries I still had in the fridge. If you want to bake this when cranberries aren't in season take a look at the original post on Food52. Or if you don't have or want to use brandy, use a bit of boiling water to re-hydrate the dried cranberries.


Sunday, February 9, 2020

Chili

This is simply a basic meat and bean chili and the recipe served me well for many years.


print

Chili                                 


Adapted from an old recipe shared decades ago by a friend named Joyce from our first Air Force assignment
Yields a Dutch oven full of chili.

For the beans:

2 cups pinto beans, sorted and brined overnight in 2 quarts of water and 1 1/2 T salt
1/2 onion
1 carrot cut into 2 inch chunks
1 stick of celery cut into 2 inch chunks
2-3 cloves of garlic, peeled
1 bay leaf
Water

Before cooking, drain the beans from the brine and rinse in a colander. In a large saucepan (I used a 4 quart pot) place the beans and the vegetable aromatics (onion half, carrot and celery chunks, garlic) and bay leaf. Cover generously with water (an inch or two above the level of the beans) and bring to a boil, watching so you avoid a boil-over. Lower heat to a simmer and cook for several hours until beans are done (the amount of time this will take depends on the age of the beans but mine took about three hours).

The rest of the ingredients:

1/2-1 pound of ground beef
1 large onion, chopped
1 teas salt
2 cloves garlic, minced
1/2 teas pepper
2 T chili powder
1 can tomato paste
1 (28-oz) can whole tomatoes (or crushed tomatoes)
1 (4-oz) can of diced green chiles or 1/2 c frozen chopped chiles, or to taste
1 cup water.

In a Dutch oven cook the ground beef, onions, and salt together until browned. Add the garlic and cook for half a minute or so until fragrant. Move the mixture to the edges of the pan and place the spices in the center of the pan and toast for a minute. Stir the spices into the meat and add the tomato paste and cook for a few minutes until the paste has darkened. Pour in the liquid from the whole tomatoes. Crush the tomatoes by hand or in the blender or food processor and place in the skillet. Stir in the green chiles and water. Bring to to strong simmer and then lower the heat and simmer for a couple hours stirring occasionally. If it gets too thick add some more water or some of the bean broth.

Note: To streamline this process you can worry less about building flavor. Add the garlic, spices, and tomato paste together. Then stir in a can of crushed tomatoes and the green chile. Continue with the recipe.

When the beans are done and are beginning to break apart remove some of the bean broth (hold a generous amount in reserve) and all the spent aromatics. Drain most of the remaining liquid, if needed. Pour the beans into the meat mixture in the Dutch oven. Stir well. Add some of the reserved bean broth until the chili is the consistency you prefer. Stir again and cook together for an hour at a low simmer. Check the consistency again and add more bean broth if needed. Taste for seasonings and add salt. If you like spicier chili add more chiles or stir in a bit of powdered cayenne. Serve with warm cornbread.

Monday, August 19, 2019

Baked Peach Oatmeal with Almonds

One more summertime oatmeal recipe.


print

Baked Peach Oatmeal with Almonds


Adapted from:  https://www.twopeasandtheirpod.com/baked-peach-almond-oatmeal/
Yields:  6-9 servings

2 c rolled oats
1/4 c light brown sugar
1 teas baking powder
1/2 teas salt
1 teas cinnamon
1/2 c chopped almonds
2 c milk,  any kind but almond milk might be particularly good
1 large egg
3 T coconut oil, melted and cooled slightly, or 3 T melted and cooled butter
1 teas vanilla extract
1/4 teas almond extract
1 1/2 c chopped peaches
Peach slices for the top, optional

Oil or butter an 8 or 9 inch square baking dish. Preheat oven to 350F.

Mix the oats, brown sugar, baking powder, salt, cinnamon, and almonds in a medium bowl.

Mix the milk, egg, coconut oil (or butter), and extracts in another bowl. Pour over the oat mixture and stir until combined.

Spread the chopped peaches on the bottom of the baking dish. Top with the oatmeal mixture and even it with an offset or rubber spatula. Top the pan with peach slices, if desired.

Bake for 40 minutes; the oatmeal should be set and the top be golden. Let it cool for 5 minutes and serve warm.

Notes:

This is not a particularly sweet version of baked oatmeal which suits me fine, but I wager many people might like it a bit sweeter. You could add another tablespoon or two of sugar without a problem. Or you might offer a bit of maple syrup when you serve it. If you have some Peach Drizzle, this would be a great use for it.

You can double this recipe and place ingredients in a 9X13 pan.

Next time, I may use 2 cups chopped peaches, especially if I have an abundance of fruit.

This can be easily reheated in the microwave but you may want to stir in a bit of milk for creaminess.


Friday, June 28, 2019

Strawberry-Rhubarb Baked Oatmeal

I love baked oatmeal but admit that it's a cool weather love. This recipe extends the oatmeal season for me. Rhubarb lends a pleasant tartness to a sweet background and since you likely won't find it in the supermarket again until next spring, frozen will work fine. (That said, keep an eye out for fresh rhubarb; I saw some 2 days ago in my local co-op.)


print

Strawberry-Rhubarb Baked Oatmeal


Serves 6-8

Next time I bake this, I'm going to add a half teaspoon grated orange zest and top it with a handful of slivered almonds. I haven't tested it, but I believe you could substitute an equal amount of strawberries for the rhubarb if it's out of season.

3 c old fashioned rolled oats
1/3-1/2 c brown sugar
1 tsp cinnamon
1 1/2 teas baking powder (at 4000-5000 ft. elevation, 2 teas. at lower elevations)
1/4 teas salt
1 teas vanilla
1/4 c vegetable oil
3 eggs
1 1/2 c milk, any kind
1/4 c yogurt
3/4 c chopped strawberries, fresh or frozen
3/4 c chopped rhubarb, fresh or frozen (red varieties are prettier, but not necessary) about half-inch dice
3-4 T cinnamon sugar

Preheat the oven to 350F. In a large measuring cup or bowl whisk together the eggs, oil, milk, yogurt, and vanilla. Mix the oats, sugar, cinnamon, baking powder, and salt in another bowl. Pour the milk mixture over the oat mixture and stir well to combine. Stir in the strawberries and rhubarb. Pour into a pie plate, a 9-inch round cake pan, or an 8-inch square pan. Sprinkle the top generously with cinnamon sugar.

Place in oven and bake for 45-50 minutes at my elevation, at lower elevations start checking at 40 minutes. When it is done, it will be fairly firm to the touch and crispy on the edges.


Friday, April 19, 2019

Sour Cream Chocolate Chip Loaf (with altitude adjustments)

I have been guilty of procrastibaking when it comes to this recipe. The tang of the sour cream and the slight bitterness of the dark chocolate nicely offset the sweetness in the bread.


print

Sour Cream Chocolate Chip Loaf


Source: How to Celebrate Everything by Jenny Rosenstrach

Changes needed for altitudes of 4000-5500 feet above sea level:
     add 2 T flour
     reduce baking soda to 1 teas
     reduce granulated sugar by scant 1 T

2 eggs
2/3 c sugar
1/2 teas vanilla
1 1/2 c flour
1 1/4 teas baking powder
1 1/4 teas baking soda
1 teas salt
1/2 c butter, melted
1 1/3 c sour cream
3/4 c dark chocolate chips
1/3 c roughly chopped walnuts

Cinnamon sugar:
1/4 c sugar
3/4 ground cinnamon

Heat the oven to 375F. Butter a standard loaf pan. Assemble the cinnamon sugar.

Beat the eggs until frothy in a large bowl with an electric mixer on medium speed, about 3 minutes. Add the sugar and vanilla, then beat until smooth. In a separate bowl, combine the dry ingredients: flour, baking powder, baking soda, and salt. 

Add the melted butter and the sour cream to the egg mixture and beat until combined. Next add the dry ingredients to the wet ingredients, a spoonful at a time, and beat just until smooth. Then fold in the chocolate chips. 

Spread half the batter in the prepared loaf pan, and sprinkle with about two thirds of the cinnamon sugar. Sprinkle with the walnuts. Then add the remaining batter and spread it evenly. Sprinkle with the remaining cinnamon sugar. 

Bake for 45-50 minutes, or until a toothpick comes out clean. Cool the loaf completely on a rack before slicing.

Note from Colette:

At my altitude, nearly 5000 feet, I used 1 teas baking powder and 3/4 teas baking soda

Monday, March 25, 2019

Cornish Pasties

I visited Cornwall and ate a pasty there but I also lived (for 4 cold winters and admittedly pleasant summers) in the Upper Peninsula of Michigan where generations earlier Cornish iron miners imported this dish. It's long been a  regional favorite. I visited the U.P. last summer and with the help of the internet found several of the best pasties available in the area. This recipe tastes just like those.


Print

Cornish Pasties


Makes 6 big hand pies; some diners can eat only half

For the crust:

2/3 c sour cream, chilled
1 large egg, lightly beaten
3 c unbleached flour
1 3/4 teas salt
16 T unsalted butter, cut in half-inch pieces and chilled

For the filling:

1 T unsalted butter
1 onion, chopped fine
salt and pepper
1 T minced fresh thyme or 1 teas dried
2 garlic cloves, minced
1 1/4 pd skirt steak, trimmed and cut into 1/2-in pieces
10 oz. russet potatoes, peeled and cut into 1/2-in pieces
10 oz. rutabaga, peeled and cut into 1/2-in pieces
1/4 c unbleached flour

For the egg wash:

1 large egg
2 teas water

Cook's Country points out that you can use turnips for rutabagas and if you can't find skirt steak substitute with 1 1/2 pounds blade steak which will require more trimming so it needs an extra quarter pound. 

For the crust:  

Mix the sour cream and egg, whisking in a small bowl. Place the flour and salt in a food processor and run for about 3 seconds. Add the butter and pulse about 10 times until pea-size pieces remain. Pour in about half the sour cream mixture and pulse about 5 times until combined. Pour in the remaining sour cream and process again until the dough begins to form a mass, about 15 pulses.

Remove from processor to a lightly floured counter and knead until the dough comes together. Place the dough on a sheet of plastic wrap and form it into a disk, about 6 inches in diameter. Place in the fridge for 30 minutes. (The dough can be made ahead and kept in the fridge about 24 hours but allow it to sit out for 15 minutes before attempting to roll out.)

For the filling:

In a 10-inch skillet at medium heat melt the butter and add the onion and 1/4 teas salt. Cook until the onion has softened. Add the thyme and garlic and cook and stir about 30 seconds until fragrant. Let this mixture cool somewhat, around 5 minutes. In a large bowl, stir the beef, potatoes, rutabaga, and onion mixture together. Add 1 1/2  teas salt, 3/4 teas pepper and stir. Then stir in the flour and toss the mixture to coat. 

To cook:

Preheat the oven to 375F and place the rack at upper-middle position. Place a sheet of parchment paper on a rimmed baking sheet (18X12). Divide the filling into 6 equal portions on a plate or tray (1 cup or more) and remove the dough from the fridge. Cut it in 6 equal portions (about 5 oz each).

On a pastry cloth or floured counter roll one portion of dough into an oval about 8 by 10 inches approximately 1/8 inch thick. Put a portion of filling on the bottom half of the dough making sure to leave half an inch or more along the edge to seal. Use water to moisten the edges of the dough and fold over the top to form a half-moon shape. Press the dough around the filling to adhere and press down on the edges to seal.

Trim ragged edges away and crimp edges to seal or pinch and twist diagonally between your thumb and forefinger.  Or you can seal with the tines of a fork. Place on baking sheet to rest while you repeat with remaining 5 portions of dough. You may place them on the sheet horizontally with three in each of two rows. (If you want to freeze any or all of the pasties they can be placed in the freezer until solid and then placed in a zippered bag for up to a month. When it comes time to cook, place in 350F oven and cook for 65-70 minutes. You'll want to remember to brush with an egg wash just before baking.)

With a paring knife cut 2 vent holes in the top of each pastie. Whisk the egg with 2 teas water and use a pastry brush to brush this mixture on each pastie (it's best not to use the egg wash if you are freezing them). Place in oven and bake about 45 minutes until the crust is golden brown and you can see the filling bubbling up through vent holes. Rotate the pasties half way through cooking. When done place pasties on a wire rack and allow to sit for about 10 minutes before serving. 

Notes:

Don't try to save time by chopping ingredients in larger chunks, particularly in case of the beef, because it may not cook through. I will try to chop meat in the food processor next time. 

When I froze half of these they were no different from those I cooked immediately after preparation. This would be a great make-ahead meal. 


Saturday, March 16, 2019

Grandma Betty's Rhubarb Crunch

Spring is around the corner--I have rhubarb leaves breaking through the soil.


Print

Grandma Betty's Rhubarb Crunch 


Adapted from my mom's recipe
Yield: an 8X8 pan

1 1/4 pd rhubarb, cut into half-inch pieces (about 5 1/2-6 cups)
1 c old fashioned oatmeal
1 c flour (I like to use wheat but you can use all-purpose)
1 c brown sugar
1/2 c salted butter
1/4 c granulated sugar
1 teas cinnamon
1 T water
1/4-1/2 c chopped nuts

Preheat the oven to 350F. 

Mix oatmeal, flour, and brown sugar in a bowl and cut in butter until crumbly. (I like to grate frozen butter into these ingredients). Pat 1/2 of the mixture into the bottom of the 8X8 pan that has been buttered. Add sliced rhubarb to pan and top it with the granulated sugar, cinnamon, and water. (If you prefer you can mix the sugar and cinnamon together before sprinkling it over the rhubarb.) Mix the chopped nuts into the remaining crumble mixture and spread over the sugared rhubarb.

Place in the oven and bake for 40-45 minutes. Rotate the pan at about the halfway point and check it at about 35 minutes to ensure the crumble topping isn't scorching (if it is, top it loosely with a sheet of aluminum foil). Use a fork to test that the rhubarb is tender. Remove from the oven and let cool for 5 minutes. Eat as is or serve with ice cream, whipped cream, Greek yogurt, or pour some unsweetened cream over the top. 

Note: The original recipe calls for 1/2 c granulated sugar. This is just too sweet for me, but if you find rhubarb overly tart, you may want to use that amount of sugar.

Tuesday, March 12, 2019

One-pot Black-eyed Pea and Sausage Soup with Kale

I'm a fan of black-eyed peas and have them in the shell stage in my freezer most of the time. I've not cooked this recipe using the dried legume but I trust the source of this recipe.

Black-eyed peas are delicious with pork and with greens. This soup would be great with any green but spinach (unless you add it at the last minute) so if you don't have kale you can use chard or collard greens. Chard will take less time to cook than kale so add it later.


print

One-pot Black-eyed Pea and Sausage Soup with Kale


Adapted from: seriouseats.com
Serves: 6

1 T oil, olive or vegetable
12 oz andouille sausage, cut into quarter inch slices (or another sausage if this is too hot)
6 oz salt pork or slab bacon (or regular if that's what you have) cut into 1/2-inch cubes
1 large leek,white and pale green parts only, cleaned and finely chopped (about 1 1/2 c)
1 large onion, finely diced (about 1 1/2 c)
2 ribs celery, finely diced (about 1 c)
1 large green bell pepper, finely chopped (about 1 c)
1 jalapeno pepper, minced (optional or to taste)
1/2 teas red pepper flakes (optional, depending on spiciness of sausage)
3 cloves garlic, thinly sliced (or minced in a garlic press, if you're in a hurry)
1 pd dried black-eyed peas
2 quarts low-sodium chicken broth
2 bay leaves
1 bunch kale, stems removed and leaves roughly chopped
salt and freshly ground pepper
1/3 c apple cider vinegar
chopped parsley, as a garnish, (optional)

In a Dutch oven heat the oil over medium heat. Stir in sausage and salt pork and cook until browned. Add leeks, onion, celery, green pepper, jalapeno (if using), red pepper flakes, and garlic. Cook about 10 minutes, scraping up the browned bits on the bottom of the Dutch oven.

Add the black-eyed peas, chicken broth, and bay leaves and a bit of salt and pepper (you can add more later--remember the sausage, salt pork, and broth are all salted). Cover the black-eyed peas with water and bring to a boil. Reduce heat but keep simmering until the black-eyed peas are tender, 45-75 minutes. This will depend on the size of the peas and their age. When the peas are getting close (try one--you should have some resistance but nothing hard) add the kale and cover until it has wilted--you might have to do this in batches. Cook until the kale is tender and the black-eyed peas are done.

Stir in the vinegar and season to taste with salt and pepper if needed. This can be refrigerated for up to 5 days.

If you use black-eyed peas in the shell stage, they will only need 35-45 minutes of cooking so you may want to add the kale a little sooner. 

Saturday, March 9, 2019

Smoky Black Bean and Sweet Potato Chili


print

Smoky Black Bean and Sweet Potato Chili


Serves: 8

This is a vegan chili but I cooked up a little chorizo as an add-in for meat eaters. It is yummy either way.

1 T oil
2 c chopped onion, about 2 medium onions
4 c cubed sweet potatoes (3/4-inch), about 1 1/4 pds
2 cloves garlic, minced
1 chipotle en adobo, finely chopped, or to taste
1 T ancho chile powder
2 teas ground cumin
1/2 teas smoked paprika
1 (14.5 oz) can tomatoes, diced or whole and crushed before adding
3 1/2 c cooked black beans, rinsed and drained if from cans (about 2 1/4 15.5 oz. cans)
1 1/2 c homemade or purchased vegetable broth
1/2 teas salt
1 avocado, for garnish, optional
1/4 c snipped chives, for garnish optional

Start heating the oil over medium heat and add the onions once it shimmers. Stir frequently and allow onions to cook until translucent and tender. Add the sweet potatoes and the garlic and cook until the sweet potatoes are beginning to get soft, about 10 minutes. Add the chipotle en adobo, ancho chile powder, cumin, and smoked paprika. Stir constantly while the spices become fragrant and mixed in, about a minute.

Add the tomatoes, beans, and broth and raise the heat to medium-high until it comes to a boil. Then reduce the heat and simmer slowly uncovered. Stir occasionally until the sweet potatoes are tender, about 30-35 minutes. If you want to change the consistency, add more broth.

Stir in the salt and taste and adjust.

Serve topped with chopped avocados and chives.

Notes:

You can find chipotle en adobo in many supermarkets these days; otherwise it's available in a Mexican market.

I made this with home cooked beans and since I used aromatics (carrot, onion, celery, garlic) while cooking the beans, I used bean broth instead of vegetable broth.

Canned diced tomatoes usually have calcium chloride added which keeps them in a consistent diced state and they don't break down with cooking. It's a matter of preference whether you use them. If you like your tomatoes to dissipate in a soup or stew, break or crush whole tomatoes but if you like chunks of tomatoes in your dish, use the diced version.